Update note: This tutorial has been updated to iOS 11, Swift 4, and Xcode 9 by Michael Ciurus. The original tutorial was written by Scott Gardner.
As you probably know, everything you see in an iOS app is a view. There’s button views, table views, slider views, and even parent views that contain other views.
But what you might not know is that each view in iOS is backed by another class called a layer – a
CALayer to be specific.
In this article, you’ll learn what a
CALayer is and how it works. You’ll also see 10 examples of using CALayers for cool effects, like shapes, gradients, and even particle systems.
This article assumes you’re familiar with the basics of iOS app development and Swift, including constructing your UI with storyboards.
Note: If you’re not quite there, no worries. You’ll be happy to know we have quite a few tutorials and books on the subject, such as Learn to Code iOS Apps with Swift and The iOS Apprentice.
How does CALayer relate to UIView?
UIView takes care of many things including layout or handling touch events. It’s interesting to notice that it doesn’t directly take care of the drawing or animations, UIKit delegates that task to its brother: CoreAnimation. UIView is in fact just a wrapper over CALayer. When you set bounds on a UIView, the view simply sets bounds on its backing CALayer. If you call layoutIfNeeded on a UIView, the call gets forwarded to the root CALayer. Each UIView has one root CALayer, which can contain sublayers.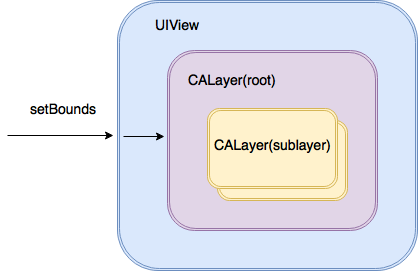
Getting Started
The easiest way to understand what layers are is to see them in action. You’ll start with a simple starter project to play around with layers. Download this simple project which is just a single view app with a view inserted in the center.
Replace the contents of ViewController.swift with the following:
import UIKit

class ViewController: UIViewController {

  @IBOutlet weak var viewForLayer: UIView!

  var layer: CALayer {
    return viewForLayer.layer
  }

  override func viewDidLoad() {
    super.viewDidLoad()
    setUpLayer()
  }

  func setUpLayer() {
    layer.backgroundColor = UIColor.blue.cgColor
    layer.borderWidth = 100.0
    layer.borderColor = UIColor.red.cgColor
    layer.shadowOpacity = 0.7
    layer.shadowRadius = 10.0
  }

  @IBAction func tapGestureRecognized(_ sender: Any) {

  }

  @IBAction func pinchGestureRecognized(_ sender: Any) {

  }

}
As mentioned earlier, every view in iOS has a layer associated with it, and you can retrieve that layer with
.layer. The first thing this code does is create a computed property called layer to access the viewForLayer‘s layer.
The code also calls
setUpLayer() to set a few properties on the layer: a shadow, a blue background color, and a huge red border. You’ll learn more about setUpLayer() in a moment, but first, build and run to the iOS Simulator and check out your customized layer:
Pretty cool effect with just a few lines of code, eh? And again – since every view is backed by a layer, you can do this kind of thing for any view in your app.
Basic CALayer Properties
CALayer has several properties that let you customize its appearance. Think back to what you’ve already done:- Changed the layer’s background color from its default of no background color to blue.
- Given it a border by changing its border width from the default 0 to 100.
- Changed its color from the default black to red.
- And, lastly, given it a shadow by changing its shadow opacity from default zero (transparent) to 0.7. This alone would cause a shadow to display, and you took it a step further by increasing its shadow radius from its default value of 3 to 10.
These are just a few of the properties you can set on
CALayer. You’ll try two more. Add these lines to the bottom of setUpLayer():layer.contents = UIImage(named: "star")?.cgImage
layer.contentsGravity = kCAGravityCenter
The
contents property on a CALayer allows you to set the layer’s content to an image, so you set it to an image named “star” here. The image has been shipped with the starter project.
Build and run and take a moment to appreciate your stunning piece of art:
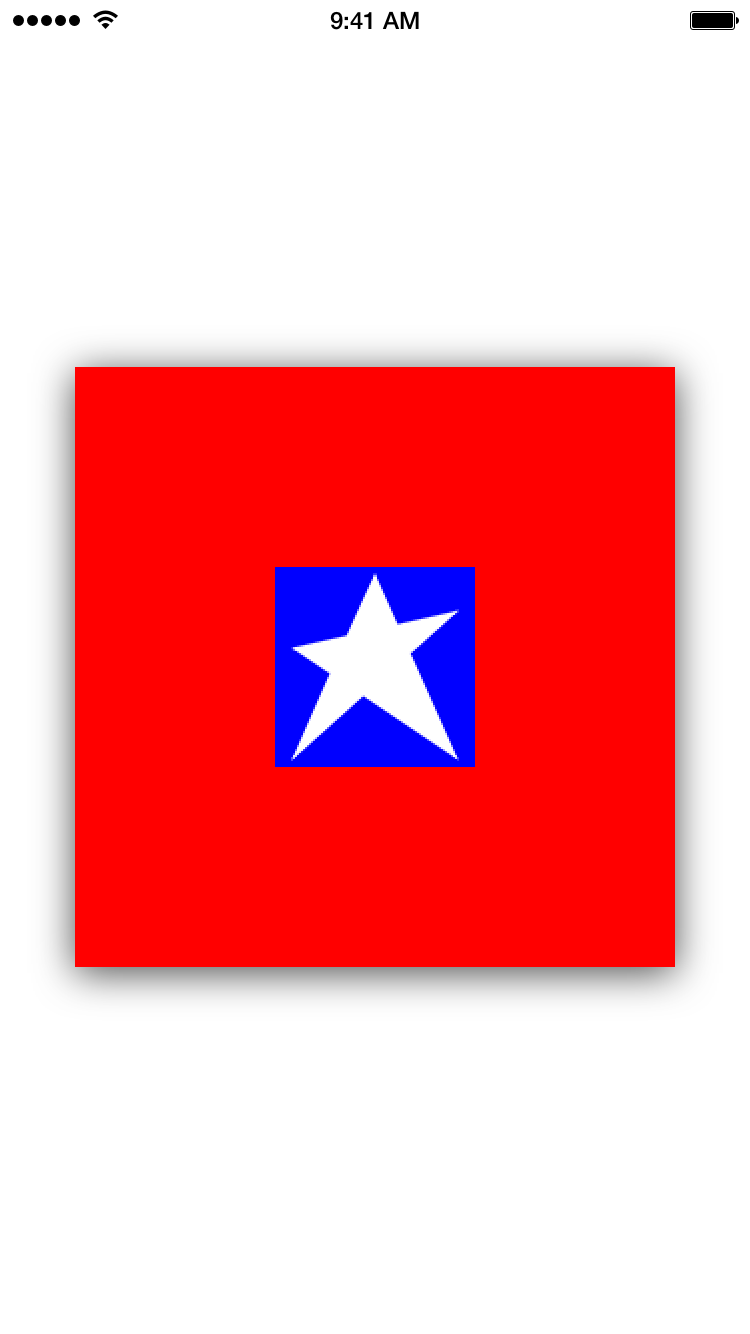
Notice how the star is centered – this is because you set the
contentsGravity property to kCAGravityCenter. As you might expect, you can also change the gravity to top, top-right, right, bottom-right, bottom, bottom-left, left and top-left.Changing the Layer’s Appearance
The starter project contains connected tap and pinch gesture recognizers.
Change
tapGestureRecognized(_:) to look like this:@IBAction func tapGestureRecognized(_ sender: UITapGestureRecognizer) {
layer.shadowOpacity = layer.shadowOpacity == 0.7 ? 0.0 : 0.7
}
This tells the
viewForLayer layer to toggle its layer’s shadow opacity between 0.7 and 0 when the view recognizes a tap.
The view, you say? Well, yes. You could override
CALayer‘s hitTest(_:) to do the same thing, and actually you’ll see that approach later in this article. But hit testing is all a layer can do because it cannot react to recognized gestures. That’s why you set up the tap gesture recognizer on the view.
Now change
pinchGestureRecognized(_:) to look like this:@IBAction func pinchGestureRecognized(_ sender: UIPinchGestureRecognizer) {
let offset: CGFloat = sender.scale < 1 ? 5.0 : -5.0
let oldFrame = layer.frame
let oldOrigin = oldFrame.origin
let newOrigin = CGPoint(x: oldOrigin.x + offset, y: oldOrigin.y + offset)
let newSize = CGSize(width: oldFrame.width + (offset * -2.0), height: oldFrame.height + (offset * -2.0))
let newFrame = CGRect(origin: newOrigin, size: newSize)
if newFrame.width >= 100.0 && newFrame.width <= 300.0 {
layer.borderWidth -= offset
layer.cornerRadius += (offset / 2.0)
layer.frame = newFrame
}
}
Here you're creating a positive or negative offset based on the user's pinch, and then adjusting the size of the layer's frame, width of its border and the border's corner radius.
A layer's corner radius is 0 by default, meaning it's a standard rectangle with 90-degree corners. Increasing the radius creates rounded corners. Want to turn a square layer into a circle? Set its corner radius to half of its width.
Note that adjusting the corner radius doesn't clip the layer's contents (the star image) unless the layer's
masksToBounds property is set to true.
Build and run, and try tapping on and pinching your view in and out:

Hey, with a little more polish you could have yourself a pretty nifty avatar maker! :]
The Great CALayer Tour
CALayer has more than just a few properties and methods to tinker with, as well as several subclasses that have unique properties and methods.
What better way to get an overview of all this great API than by taking a guided tour, raywenderlich.com-style?
For the rest of this article, you will need the following:
This is a handy app that includes examples of 10 different types of
CALayers, which you'll learn about in this article. Here's a sneak peak of some juicy examples: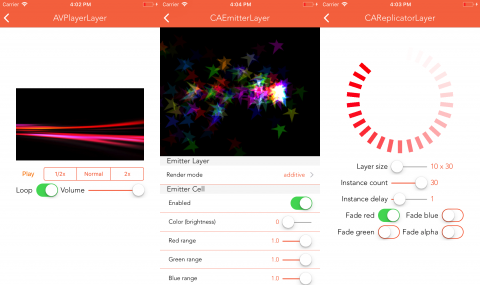
As you go through each example below, I recommend you play around with it in the
CALayer app, and look at the source code provided. You don't need to actually code anything for the rest of this article, so just sit back, read, and relax :]Example #1: CALayer
You've already seen an example of using
CALayer, and setting a few of the properties.
There are a few things that weren't mentioned about
CALayers yet:- Layers can have sublayers. Just like views can have subviews, layers can have sublayers. You can use this for some cool effects!
- Layer properties are animated. When you change the property of a layer, it is animated over time by default. You can also customize this animation behavior to your own timing.
- Layers are lightweight. Layers are lighter-weight than views, and therefore they help you achieve better performance.
- Layers have tons of useful properties. You've seen a few already, but let's take a look at a few more!
You'll take a tour of the full list of
CALayer properties - some you haven't seen yet, and are quite handy!let layer = CALayer()
layer.frame = someView.bounds
layer.contents = UIImage(named: "star")?.cgImage
layer.contentsGravity = kCAGravityCenter
As previously seen, this creates a
CALayer instance and sets it to the bounds of someView. Then sets an image as the layer's contents and centers it within the layer. Notice that the underlying Quartz image data (CGImage) is assigned.layer.magnificationFilter = kCAFilterLinear
layer.isGeometryFlipped = false
You use this filter when enlarging the image via
contentsGravity, which can be used to change both size (resize, resize aspect, and resize aspect fill) and position (center, top, top-right, right, etc.).
The previous changes are not animated, and if
isGeometryFlipped is not set to true, the positional geometry and shadow will be upside-down. Continuing on:layer.backgroundColor = UIColor(red: 11/255.0, green: 86/255.0, blue: 14/255.0, alpha: 1.0).cgColor
layer.opacity = 1.0
layer.isHidden = false
layer.masksToBounds = false
You set the background color to Ray's favorite shade of green :] That makes the layer opaque and visible. At the same time, you tell the layer to not mask its contents, which means that if its size is smaller than its contents (the star image), the image will not be clipped.
layer.cornerRadius = 100.0
layer.borderWidth = 12.0
layer.borderColor = UIColor.white.cgColor
The layer's corner radius is set to half the width of the layer to create visuals of a circle with a border; notice that layer colors are assigned as the Quartz color references (
CGColor).layer.shadowOpacity = 0.75
layer.shadowOffset = CGSize(width: 0, height: 3)
layer.shadowRadius = 3.0
someView.layer.addSublayer(layer)
You create a shadow and set
shouldRasterize to true (discussed below), and then add the layer to the view hierarchy.
Here's the result:
CALayer has two additional properties that can improve performance: shouldRasterize and drawsAsynchronously.shouldRasterize is false by default, and when set to true it can improve performance because a layer's contents only need to be rendered once. It's perfect for objects that are animated around the screen but don't change in appearance.drawsAsynchronously is sort of the opposite of shouldRasterize. It's also false by default. Set it to true to improve performance when a layer's contents must be repeatedly redrawn, such as when you work with an emitter layer that continuously renders animated particles. (See the CAEmitterLayer example later.)
A Word of Caution: Consider the implications before setting either
shouldRasterize or drawsAsynchronously. Compare the performance between true and false so you know if activating these features actually improves performance. When misused, performance is likely to take a nosedive.
Now shift your attention briefly to Layer Player. It includes controls to manipulate many of
CALayer's properties: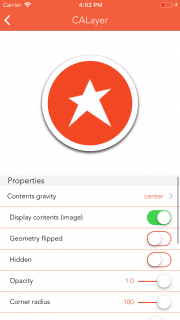
Play around with the various controls - it's a great way to get a feel of what you can do with
CALayer!
Note: Layers are not part of the responder chain so they won't directly react to touches or gestures like views can, as you saw in the CALayerPlayground example.
However, you can hit test them, as you'll see in the example code for
CATransformLayer. You can also add custom animations to layers, which you'll see when you get to CAReplicatorLayer.Example #2: CAScrollLayer
CAScrollLayer displays a portion of a scrollable layer. It's fairly basic and cannot directly respond to user touches or even check the bounds of the scrollable layer, but it does cool things like preventing scrolling beyond the bounds ad infinitum! :]UIScrollView doesn't use a CAScrollLayer to do its work, instead it directly changes its layer's bounds.
What you can do with a
CAScrollLayer is to set its scrolling mode to horizontal and/or vertical, and programmatically tell it to scroll to a specific point or area:// 1
var scrollingViewLayer: CAScrollLayer {
return scrollingView.layer as! CAScrollLayer
}
override func viewDidLoad() {
super.viewDidLoad()
// 2
scrollingViewLayer.scrollMode = kCAScrollBoth
}
@IBAction func panRecognized(_ sender: UIPanGestureRecognizer) {
var newPoint = scrollingView.bounds.origin
newPoint.x -= sender.translation(in: scrollingView).x
newPoint.y -= sender.translation(in: scrollingView).y
sender.setTranslation(CGPoint.zero, in: scrollingView)
// 3
scrollingViewLayer.scroll(to: newPoint)
if sender.state == .ended {
UIView.animate(withDuration: 0.3, delay: 0, options: [], animations: {
self.scrollingViewLayer.scroll(to: CGPoint.zero)
})
}
}
In the above code:
- A computed property is used to return the underlying
CAScrollLayerlayer of thescrollingView. - Scrolling is initially set to both horizontal and vertical.
- When a pan is recognized, a new point is created and the scrolling layer scrolls to that point inside a
UIViewanimation. Note thatscroll(to:)doesn't animate automatically.
Layer Player demonstrates a
CAScrollLayer that houses an image view with an image that's larger than the scrolling view's bounds. When you run the above code and pan the view, this would be the result:
Layer Player includes two controls to lock scrolling horizontally and vertically.
Here are some rules of thumb for when to use (or not to use)
CAScrollLayer:- If you want something lightweight and only need to programmatically scroll, consider using
CAScrollLayer. - If you want the user to be able to scroll, you're probably better off with
UIScrollView. To learn more, check out our 18-part video tutorial series on this. - If you are scrolling a very large image, consider using
CATiledLayer(more below).
Example #3: CATextLayer
CATextLayer provides simple but fast rendering of plain text or attributed strings. Unlike UILabel, a CATextLayer cannot have an assigned UIFont, only a CTFontRef or CGFontRef.
With a block of code like this, it's possible to manipulate the font, font size, color, alignment, wrapping and truncation, as well as animate the changes:
// 1
let textLayer = CATextLayer()
textLayer.frame = someView.bounds

// 2
let string = String(
  repeating: "Lorem ipsum dolor sit amet, consectetur adipiscing elit. Fusce auctor arcu quis velit
             congue dictum. ",
  count: 20
)

textLayer.string = string

// 3
textLayer.font = CTFontCreateWithName(fontName, fontSize, nil)

// 4
textLayer.foregroundColor = UIColor.darkGray.cgColor
textLayer.isWrapped = true
textLayer.alignmentMode = kCAAlignmentLeft
textLayer.contentsScale = UIScreen.main.scale
someView.layer.addSublayer(textLayer)
Explanation of the above code:
- Creates a
CATextLayerinstance and sets its tosomeView's bounds. - Creates a string of repeated text and assigns it to the text layer.
- Creates a font and assigns it to the text layer.
- Sets the text layer to wrap and left-align, (you have the option of setting it to natural, right, center and justified) and matches its
contentsScaleto the screen, and then adds the layer to the view hierarchy.
All layer classes, not just
CATextLayer, render at a scale factor of 1 by default. When attached to views, layers automatically have their contentsScale set to the appropriate scale factor for the current screen. You need to set the contentsScale explicitly for layers you create manually, or else their scale factor will be 1 and you'll have pixelation on retina displays.
If added to a square-shaped
UIView, the created text layer would look like this: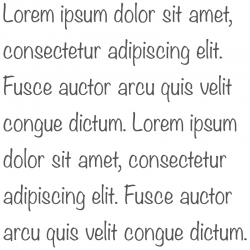
Truncation is a setting you can play with, and it's nice when you'd like to represent clipped text with an ellipsis. Truncation defaults to none and can be set to start, end and middle:
Layer Player has controls to change many of
CATextLayer's properties: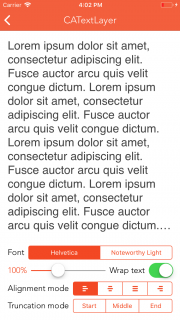
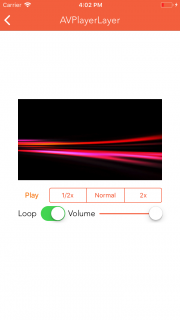
Example #4: AVPlayerLayer
AVPlayerLayer adds a sweet layer of goodness to AVFoundation. It holds an AVPlayer to play AV media files (AVPlayerItems). Here's an example of creating an AVPlayerLayer:var player: AVPlayer!
override func viewDidLoad() {
super.viewDidLoad()
// 1
let playerLayer = AVPlayerLayer()
playerLayer.frame = someView.bounds
// 2
let url = Bundle.main.url(forResource: "someVideo", withExtension: "m4v")
player = AVPlayer(url: url!)
// 3
player.actionAtItemEnd = .none
playerLayer.player = player
someView.layer.addSublayer(playerLayer)
// 4
NotificationCenter.default.addObserver(self,
selector: #selector(playerDidReachEnd),
name: .AVPlayerItemDidPlayToEndTime,
object: player.currentItem)
}
deinit {
NotificationCenter.default.removeObserver(self)
}
A breakdown of the above code:
- Creates a new player layer and sets its frame.
- Creates a player with an AV asset.
- Tells the player to do nothing when it finishes playing; additional options include pausing or advancing to the next asset, if applicable.
- Registers for AVPlayer's notification when it finishes playing an asset (and remove the controller as an observer in
deinit).
Next, when the play button is tapped, it toggles controls to play the AV asset and set the button's title.
@IBAction func playButtonTapped(sender: UIButton) {
  if playButton.titleLabel?.text == "Play" {
    player.play()
    playButton.setTitle("Pause", for: .normal)
  } else {
    player.pause()
    playButton.setTitle("Play", for: .normal)
  }
}
Then move the playback cursor to the beginning when the player has reached the end.
@objc func playerDidReachEnd(notification: NSNotification) {
  let playerItem = notification.object as! AVPlayerItem
  playerItem.seek(to: kCMTimeZero, completionHandler: nil)
}
Note this is just a simple example to get you started. In a real project, it would generally not be advisable to pivot on a button's title text.
The
AVPlayerLayer and its AVPlayer created above would be visually represented by the first frame of the AVPlayerItem instance, like this: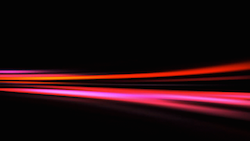
AVPlayerLayer has a couple additional properties:videoGravitysets the resizing behavior of the video display.isReadyForDisplaychecks if the video is ready for display.
AVPlayer, on the other hand, has quite a few additional properties and methods. One to note is rate, which is the playback rate from 0 to 1. Zero means to pause, and 1 means the video plays at regular speed (1x).
However, setting
rate also instructs playback to commence at that rate. In other words, calling pause() and setting rate to 0 does the same thing, as calling play() and setting rate to 1.
So what about fast forward, slow motion or playing in reverse?
AVPlayer has you covered. Setting rate to anything higher than 1 is equivalent to asking the player to commence playback at that number times regular speed, for instance, setting rate to 2 means double-speed.
As you might assume, setting
rate to a negative number instructs playback to commence at that number times regular speed in reverse.
Before playback occurs at any rate other than regular speed (forward), however, the appropriate variable is checked on the
AVPlayerItem to verify that it can be played back at that rate:canPlayFastForwardfor any number higher than 1canPlaySlowForwardfor any number between 0 and up to, but not including, 1canPlayReversefor -1canPlaySlowReversefor any number between -1 and up to, but not including, 0canPlayFastReversefor any number lower than -1
Most videos can typically play at various forward speeds, but it's less typical that they can play in reverse. Layer Player also includes playback controls:
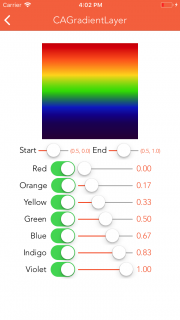
Example #5: CAGradientLayer
CAGradientLayer makes it easy to blend two or more colors together, making it especially well suited to backgrounds. To configure it, you assign an array of CGColors, as well as a startPoint and an endPoint to specify where the gradient layer should begin and end.
Bear in mind,
startPoint and endPoint are not explicit points. Rather, they are defined in the unit coordinate space and then mapped to the layer's bounds when drawn. In other words, an x value of 1 means the point is at the right edge of the layer, and a y value of 1 means the point is at the bottom edge of the layer.CAGradientLayer has a type property, although kCAGradientLayerAxial is the only option, and it transitions through each color in the array linearly.
This means that if you draw a line (A) between
startPoint and endPoint, the gradations would occur along an imaginary line (B) that is perpendicular to A, and all points along B would be the same color: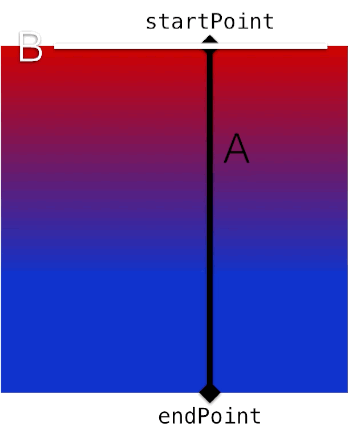
Alternatively, you can control the
locations property with an array of values between 0 and 1 that specify relative stops where the gradient layer should use the next color in the colors array.
If left unspecified the stop locations default to evenly spaced. If
locations is set, though, its count must match colors count, or else undesirable things will happen :[
Here's an example of how to create a gradient layer:
func cgColor(red: CGFloat, green: CGFloat, blue: CGFloat) -> CGColor {
  return UIColor(red: red/255.0, green: green/255.0, blue: blue/255.0, alpha: 1.0).cgColor
}

let gradientLayer = CAGradientLayer()
gradientLayer.frame = someView.bounds
gradientLayer.colors = [cgColor(red: 209.0, green: 0.0, blue: 0.0),
                        cgColor(red: 255.0, green: 102.0, blue: 34.0),
                        cgColor(red: 255.0, green: 218.0, blue: 33.0),
                        cgColor(red: 51.0, green: 221.0, blue: 0.0),
                        cgColor(red: 17.0, green: 51.0, blue: 204.0),
                        cgColor(red: 34.0, green: 0.0, blue: 102.0),
                        cgColor(red: 51.0, green: 0.0, blue: 68.0)]

gradientLayer.startPoint = CGPoint(x: 0, y: 0)
gradientLayer.endPoint = CGPoint(x: 0, y: 1)
someView.layer.addSublayer(gradientLayer)
In the above code, you create a gradient layer, match its frame to the bounds of
someView, assign an array of colors, set start and end points, and add the gradient layer to the view hierarchy. Here's what it would look like: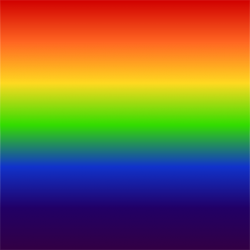
So colorful! Next, you'll program a butterfly that comes fluttering out of the app to tickle your nose. :]
Layer Player provides you controls to change start and end points, colors and locations:
Example #6: CAReplicatorLayer
CAReplicatorLayer duplicates a layer a specified number of times, which allows you to create some cool effects.
Each layer copy can have its own color and positioning changes, and its drawing can be delayed to give an animation effect to the overall replicator layer. Depth can also be preserved to give the replicator layer a 3D effect. Here's an example:
First, create an instance of
CAReplicatorLayer and set its frame to someView's bounds.let replicatorLayer = CAReplicatorLayer()
replicatorLayer.frame = someView.bounds
Next, set the replicator layer's number of copies (
instanceCount) and drawing delay. Also set the replicator layer to be 2D (preservesDepth = false) and its instance color to white.replicatorLayer.instanceCount = 30
replicatorLayer.instanceDelay = CFTimeInterval(1 / 30.0)
replicatorLayer.preservesDepth = false
replicatorLayer.instanceColor = UIColor.white.cgColor
Then, add red/green/blue offsets to the color values of each successive replicated instance.
replicatorLayer.instanceRedOffset = 0.0
replicatorLayer.instanceGreenOffset = -0.5
replicatorLayer.instanceBlueOffset = -0.5
replicatorLayer.instanceAlphaOffset = 0.0
Each defaults to 0, and that effectively preserves color value across all instances. However, in this case, the instance color was originally set to white, meaning red, green and blue are 1.0 already. Hence, setting red to 0 and the green and blue offset values to a negative number allows red to be the prominent color. Similarly, add the alpha offset to the alpha of each successive replicated instance.
After that, create a transform to rotate each successive instance around a circle.
let angle = Float(Double.pi * 2.0) / 30
replicatorLayer.instanceTransform = CATransform3DMakeRotation(CGFloat(angle), 0.0, 0.0, 1.0)
someView.layer.addSublayer(replicatorLayer)
Then create an instance layer for the replicator layer to use and set its frame so the first instance will be drawn at center x and at the top of
someView's bounds. Also, set the instance's color and add the instance layer to the replicator layer.let instanceLayer = CALayer()
let layerWidth: CGFloat = 10.0
let midX = someView.bounds.midX - layerWidth / 2.0
instanceLayer.frame = CGRect(x: midX, y: 0.0, width: layerWidth, height: layerWidth * 3.0)
instanceLayer.backgroundColor = UIColor.white.cgColor
replicatorLayer.addSublayer(instanceLayer)
Now, make a fade animation to animate opacity from 1 (opaque) to 0 (transparent).
let fadeAnimation = CABasicAnimation(keyPath: "opacity")
fadeAnimation.fromValue = 1.0
fadeAnimation.toValue = 0.0
fadeAnimation.duration = 1
fadeAnimation.repeatCount = Float.greatestFiniteMagnitude
And, finally, set the instance layer's opacity to 0 so that it's transparent until each instance is drawn and its color and alpha values are set.
instanceLayer.opacity = 0.0
instanceLayer.add(fadeAnimation, forKey: "FadeAnimation")
And here's what that code would get you:
Layer Player includes controls to manipulate most of these properties:

Example #7: CATiledLayer
CATiledLayer asynchronously draws layer content in tiles. This is great for very large images or other sets of content where you are only looking at small bits at a time, because you can start seeing your content without having to load it all into memory.
There are a couple of ways to handle the drawing. One is to override
UIView and use a CATiledLayer to repeatedly draw tiles to fill up view's background, like this:
The view controller shows a
TiledBackgroundView:import UIKit
class ViewController: UIViewController {
@IBOutlet weak var tiledBackgroundView: TiledBackgroundView!
}
The overriden
TiledBackgroundView view is defined like so:import UIKit
class TiledBackgroundView: UIView {
let sideLength: CGFloat = 50.0
// 1
override class var layerClass: AnyClass {
return CATiledLayer.self
}
// 2
required init?(coder aDecoder: NSCoder) {
super.init(coder: aDecoder)
srand48(Int(Date().timeIntervalSince1970))
let layer = self.layer as! CATiledLayer
let scale = UIScreen.main.scale
layer.contentsScale = scale
layer.tileSize = CGSize(width: sideLength * scale, height: sideLength * scale)
}
// 3
override func draw(_ rect: CGRect) {
let context = UIGraphicsGetCurrentContext()
let red = CGFloat(drand48())
let green = CGFloat(drand48())
let blue = CGFloat(drand48())
context?.setFillColor(red: red, green: green, blue: blue, alpha: 1.0)
context?.fill(rect)
}
}
Here's what's happening in the above code:
layerClassis overridden so the layer for this view is created as an instance ofCATiledLayer.- Seeds the
rand48()function that will be used to generate random colors indraw(_:). Then scales the contents of the layer (cast as aCATiledLayer) to match the screen's scale and its tile size set. - Overrides
draw(_:)to fill the view with tiled layers with random colors.
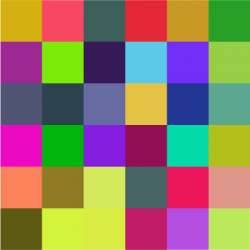
Ultimately, the above code draws a 6x6 grid of randomly colored square tiles, like this:
Layer Player expands upon this usage by also drawing a path on top of the tiled layer background:
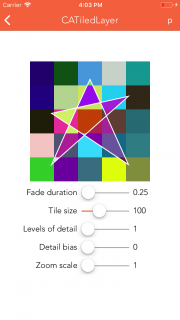
CATiledLayer – Levels of detail
The star in the above screenshot becomes blurry as you zoom in on the view:
This blurriness is the result of levels of detail maintained by the layer.
CATiledLayer has two properties, levelsOfDetail and levelsOfDetailBias.levelsOfDetail, as its name aptly applies, is the number of levels of detail maintained by the layer. It defaults to 1, and each incremental level caches at half the resolution of the previous level. The maximum levelsOfDetail value for a layer is that on which its bottom-most level of detail has at least one pixel.levelsOfDetailBias, on the other hand, is the number of magnified levels of detail cached by this layer. It defaults to 0, meaning no additional magnified levels will be cached, and each incremental level will be cached at double the preceding level's resolution.
For example, increasing the
levelsOfDetailBias to 5 for the blurry tiled layer above would result in caching levels magnified at 2x, 4x, 8x, 16x and 32x, and the zoomed in layer would look like this: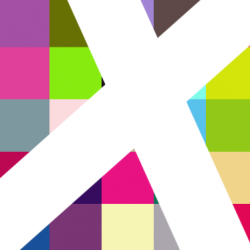
Pretty cool, eh? But wait, there's more!
CATiledLayer – Asynchronous drawing
CATiledLayer has another useful purpose: asynchronously drawing tiles of a very large image, for example, within a scroll view.
You have to provide the tiles and logic to tell the tiled layer which tiles to grab as the user scrolls around, but the performance gain here is remarkable.
Layer Player includes a
UIImage extension in a file named UIImage+TileCutter.swift. Fellow iOS colleague Nick Lockwood adapted this code for his Terminal app, which he provided in his excellent book, iOS Core Animation: Advanced Techniques.
Its job is to slice and dice the source image into square tiles of the specified size, named according to the column and row location of each tile; for example, windingRoad_6_2.png for the tile at column 7, row 3 (zero-indexed):

With those tiles in place, a custom
UIView subclass can be created to draw those tile layers:import UIKit
// 1
let sideLength: CGFloat = 640.0
let fileName = "windingRoad"
class TilingViewForImage: UIView {
let cachesPath = NSSearchPathForDirectoriesInDomains(.cachesDirectory, .userDomainMask, true)[0] as String
// 2
override class var layerClass : AnyClass {
return CATiledLayer.self
}
// 3
required init?(coder aDecoder: NSCoder) {
super.init(coder: aDecoder)
guard let layer = self.layer as? CATiledLayer else { return nil }
layer.tileSize = CGSize(width: sideLength, height: sideLength)
}
The above code:
- Creates properties for the length of the tile side, base image filename, and the path to the caches directory where the TileCutter extension saves tiles.
- Overrides
layerClassto returnCATiledLayer. - Implements
init(coder:), in the view's layer, casts it as a tiled layer and sets its tile size. Note that it is not necessary to matchcontentsScaleto the screen scale, because you're working with the backing layer of the view directly.
Next, override
draw(_:) to draw each tile according to its column and row position. override func draw(_ rect: CGRect) {
let firstColumn = Int(rect.minX / sideLength)
let lastColumn = Int(rect.maxX / sideLength)
let firstRow = Int(rect.minY / sideLength)
let lastRow = Int(rect.maxY / sideLength)
for row in firstRow...lastRow {
for column in firstColumn...lastColumn {
guard let tile = imageForTile(atColumn: column, row: row) else {
continue
}
let x = sideLength * CGFloat(column)
let y = sideLength * CGFloat(row)
let point = CGPoint(x: x, y: y)
let size = CGSize(width: sideLength, height: sideLength)
var tileRect = CGRect(origin: point, size: size)
tileRect = bounds.intersection(tileRect)
tile.draw(in: tileRect)
}
}
}
func imageForTile(atColumn column: Int, row: Int) -> UIImage? {
let filePath = "\(cachesPath)/\(fileName)_\(column)_\(row)"
return UIImage(contentsOfFile: filePath)
}
}
Then a
TilingViewForImage, sized to the original image's dimensions can be added to a scroll view.
And voilà, you have buttery smooth scrolling of a large image (5120 x 3200 in the case of Layer Player), thanks to
CATiledLayer:
As you can see in the above animation, though, there is noticeable blockiness when fast-scrolling as individual tiles are drawn. Minimize this behavior by using smaller tiles (the tiles used in the above example were cut to 640 x 640) and by creating a custom
CATiledLayer subclass and overriding fadeDuration() to return 0:class TiledLayer: CATiledLayer {
override class func fadeDuration() -> CFTimeInterval {
return 0.0
}
}
Example #8: CAShapeLayer
CAShapeLayer makes use of scalable vector paths to draw, and it's much faster than using images. Another part of the win here is that you'll no longer need to provide images at regular, @2x and @3x sizes. w00t!
Additionally, you have a variety of properties at your disposal to customize line thickness, color, dashing, how lines join other lines, and if that area should be filled and with what color, and more. Here's an example:
First, create the color, path, and shape layer.
import UIKit

class ViewController: UIViewController {

  @IBOutlet weak var someView: UIView!

  let rwColor = UIColor(red: 11/255.0, green: 86/255.0, blue: 14/255.0, alpha: 1.0)
  let rwPath = UIBezierPath()
  let rwLayer = CAShapeLayer()
Next, draw the shape layer's path. You do this by drawing from point to point using methods like
move(to:)or addLine(to:). func setUpRWPath() {
rwPath.move(to: CGPoint(x: 0.22, y: 124.79))
rwPath.addLine(to: CGPoint(x: 0.22, y: 249.57))
rwPath.addLine(to:CGPoint(x: 124.89, y: 249.57))
rwPath.addLine(to:CGPoint(x: 249.57, y: 249.57))
rwPath.addLine(to:CGPoint(x: 249.57, y: 143.79))
rwPath.addCurve(to:CGPoint(x: 249.37, y: 38.25),
controlPoint1: CGPoint(x: 249.57, y: 85.64),
controlPoint2: CGPoint(x: 249.47, y: 38.15))
rwPath.addCurve(to:CGPoint(x: 206.47, y: 112.47),
controlPoint1: CGPoint(x: 249.27, y: 38.35),
controlPoint2: CGPoint(x: 229.94, y: 71.76))
rwPath.addCurve(to:CGPoint(x: 163.46, y: 186.84),
controlPoint1: CGPoint(x: 182.99, y: 153.19),
controlPoint2: CGPoint(x: 163.61, y: 186.65))
rwPath.addCurve(to:CGPoint(x: 146.17, y: 156.99),
controlPoint1: CGPoint(x: 163.27, y: 187.03),
controlPoint2: CGPoint(x: 155.48, y: 173.59))
rwPath.addCurve(to:CGPoint(x: 128.79, y: 127.08),
controlPoint1: CGPoint(x: 136.82, y: 140.43),
controlPoint2: CGPoint(x: 129.03, y: 126.94))
rwPath.addCurve(to:CGPoint(x: 109.31, y: 157.77),
controlPoint1: CGPoint(x: 128.59, y: 127.18),
controlPoint2: CGPoint(x: 119.83, y: 141.01))
rwPath.addCurve(to:CGPoint(x: 89.83, y: 187.86),
controlPoint1: CGPoint(x: 98.79, y: 174.52),
controlPoint2: CGPoint(x: 90.02, y: 188.06))
rwPath.addCurve(to:CGPoint(x: 56.52, y: 108.28),
controlPoint1: CGPoint(x: 89.24, y: 187.23),
controlPoint2: CGPoint(x: 56.56, y: 109.11))
rwPath.addCurve(to:CGPoint(x: 64.02, y: 102.25),
controlPoint1: CGPoint(x: 56.47, y: 107.75),
controlPoint2: CGPoint(x: 59.24, y: 105.56))
rwPath.addCurve(to:CGPoint(x: 101.42, y: 67.57),
controlPoint1: CGPoint(x: 81.99, y: 89.78),
controlPoint2: CGPoint(x: 93.92, y: 78.72))
rwPath.addCurve(to:CGPoint(x: 108.38, y: 30.65),
controlPoint1: CGPoint(x: 110.28, y: 54.47),
controlPoint2: CGPoint(x: 113.01, y: 39.96))
rwPath.addCurve(to:CGPoint(x: 10.35, y: 0.41),
controlPoint1: CGPoint(x: 99.66, y: 13.17),
controlPoint2: CGPoint(x: 64.11, y: 2.16))
rwPath.addLine(to:CGPoint(x: 0.22, y: 0.07))
rwPath.addLine(to:CGPoint(x: 0.22, y: 124.79))
rwPath.close()
}
If writing this sort of boilerplate drawing code is not your cup of tea, check out PaintCode; it generates the code for you by letting you draw using intuitive visual controls or import existing vector (SVG) or Photoshop (PSD) files.
Then, set up the shape layer:
  func setUpRWLayer() {
    rwLayer.path = rwPath.cgPath
    rwLayer.fillColor = rwColor.cgColor
    rwLayer.fillRule = kCAFillRuleNonZero
    rwLayer.lineCap = kCALineCapButt
    rwLayer.lineDashPattern = nil
    rwLayer.lineDashPhase = 0.0
    rwLayer.lineJoin = kCALineJoinMiter
    rwLayer.lineWidth = 1.0
    rwLayer.miterLimit = 10.0
    rwLayer.strokeColor = rwColor.cgColor
  }
Set its path to the path drawn above, its fill color to the color created in step 1, and set the fill rule explicitly to the default value of non-zero.
- The only other option is even-odd, and for this shape that has no intersecting paths the fill rule makes little difference.
- The non-zero rule counts left-to-right paths as +1 and right-to-left paths as -1; it adds up all values for paths and if the total is greater than 0, it fills the shape(s) formed by the paths.
- Essentially, non-zero fills all points inside the shape.
- The even-odd rule counts the total number of path crossings that form a shape and if the count is odd, that shape is filled. This is definitely a case when a picture is worth a thousand words.
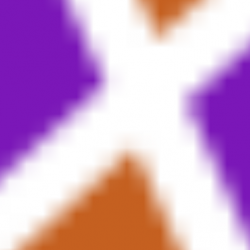
The number of path crossings in the even-odd diagram that form the pentagon shape is even, so the pentagon is not filled, whereas the number path crossings that form each triangle is odd, so the triangles are filled.


Finally, call the path drawing and layer set up code, and then it add the layer to the view hierarchy.
  override func viewDidLoad() {
    super.viewDidLoad()

    setUpRWPath()
    setUpRWLayer()
    someView.layer.addSublayer(rwLayer)
  }

}
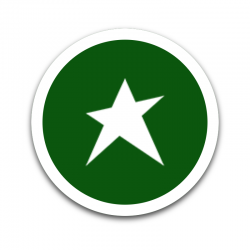
This code draws the raywenderlich.com logo:

And in case you're curious to know what this drawing looks like in PaintCode:
Layer Player includes controls to manipulate many of
CAShapeLayer's properties: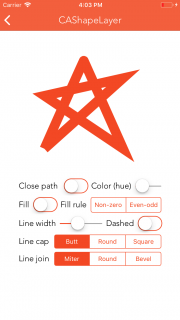
Note: You may notice that we're skipping over the next demo in the Layer Player app. This is because
CAEAGLLayer is effectively obsoleted by CAMetalLayer, which debuted with iOS 8 alongside the Metal framework. You can find a great tutorial covering CAMetalLayer here.Example #9: CATransformLayer
CATransformLayer does not flatten its sublayer hierarchy like other layer classes, so it's handy for drawing 3D structures. It's actually a container for its sublayers, and each sublayer can have its own transforms and opacity changes, however, it ignores changes to other rendered layer properties such as border width and color.
You cannot directly hit test a transform layer because it doesn't have a 2D coordinate space to map a touch point to, however, it's possible to hit test individual sublayers. Here's an example:
First create properties for the side length, colors for each side of the cube, and a transform layer.
import UIKit

class ViewController: UIViewController {

  @IBOutlet weak var someView: UIView!

  let sideLength = CGFloat(160.0)
  let redColor = UIColor.red
  let orangeColor = UIColor.orange
  let yellowColor = UIColor.yellow
  let greenColor = UIColor.green
  let blueColor = UIColor.blue
  let purpleColor = UIColor.purple
  let transformLayer = CATransformLayer()
Create some helper code to create each side layer of a cube with the specified color, and to convert degrees to radians. Why radians? Simply because I find it more intuitive to work with degrees than radians. :]
  func sideLayer(color: UIColor) -> CALayer {
    let layer = CALayer()
    layer.frame = CGRect(origin: CGPoint.zero, size: CGSize(width: sideLength, height: sideLength))
    layer.position = CGPoint(x: someView.bounds.midX, y: someView.bounds.midY)
    layer.backgroundColor = color.cgColor
    return layer
  }

  func degreesToRadians(_ degrees: Double) -> CGFloat {
    return CGFloat(degrees * .pi / 180.0)
  }
Then build a cube by creating, rotating and then adding each side to the transform layer. Then set the transform layer's z axis anchor point, rotate the cube and add the cube to the view hierarchy.
  func setUpTransformLayer() {
    var layer = sideLayer(color: redColor)
    transformLayer.addSublayer(layer)

    layer = sideLayer(color: orangeColor)
    var transform = CATransform3DMakeTranslation(sideLength / 2.0, 0.0, sideLength / -2.0)
    transform = CATransform3DRotate(transform, degreesToRadians(90.0), 0.0, 1.0, 0.0)
    layer.transform = transform
    transformLayer.addSublayer(layer)

    layer = sideLayer(color: yellowColor)
    layer.transform = CATransform3DMakeTranslation(0.0, 0.0, -sideLength)
    transformLayer.addSublayer(layer)

    layer = sideLayer(color: greenColor)
    transform = CATransform3DMakeTranslation(sideLength / -2.0, 0.0, sideLength / -2.0)
    transform = CATransform3DRotate(transform, degreesToRadians(90.0), 0.0, 1.0, 0.0)
    layer.transform = transform
    transformLayer.addSublayer(layer)

    layer = sideLayer(color: blueColor)
    transform = CATransform3DMakeTranslation(0.0, sideLength / -2.0, sideLength / -2.0)
    transform = CATransform3DRotate(transform, degreesToRadians(90.0), 1.0, 0.0, 0.0)
    layer.transform = transform
    transformLayer.addSublayer(layer)

    layer = sideLayer(color: purpleColor)
    transform = CATransform3DMakeTranslation(0.0, sideLength / 2.0, sideLength / -2.0)
    transform = CATransform3DRotate(transform, degreesToRadians(90.0), 1.0, 0.0, 0.0)
    layer.transform = transform
    transformLayer.addSublayer(layer)

    transformLayer.anchorPointZ = sideLength / -2.0
    rotate(xOffset: 16.0, yOffset: 16.0)
  }
Next write a function that applies a rotation based on specified x and y offsets. Notice that the code sets the transform to
sublayerTransform, and that applies to the sublayers of the transform layer. func rotate(xOffset: Double, yOffset: Double) {
let totalOffset = sqrt(xOffset * xOffset + yOffset * yOffset)
let totalRotation = CGFloat(totalOffset * .pi / 180.0)
let xRotationalFactor = CGFloat(totalOffset) / totalRotation
let yRotationalFactor = CGFloat(totalOffset) / totalRotation
let currentTransform = CATransform3DTranslate(transformLayer.sublayerTransform, 0.0, 0.0, 0.0)
let x = xRotationalFactor * currentTransform.m12 - yRotationalFactor * currentTransform.m11
let y = xRotationalFactor * currentTransform.m22 - yRotationalFactor * currentTransform.m21
let z = xRotationalFactor * currentTransform.m32 - yRotationalFactor * currentTransform.m31
let rotation = CATransform3DRotate(transformLayer.sublayerTransform, totalRotation, x, y, z)
transformLayer.sublayerTransform = rotation
}
Then observe touches and cycle through the sublayers of the transform layer. Hit test each one and break out as soon as a hit is detected, since there are no benefits to hit testing remaining layers.
  override func touchesBegan(_ touches: Set<UITouch>, with event: UIEvent?) {
    guard let location = touches.first?.location(in: someView) else {
      return
    }
    for layer in transformLayer.sublayers! where layer.hitTest(location) != nil {
      print("Transform layer tapped!")
      break
    }
  }
Finally, set up the transform layer and add it to the view hierarchy.
  override func viewDidLoad() {
    super.viewDidLoad()

    setUpTransformLayer()
    someView.layer.addSublayer(transformLayer)
  }
}
Note: So what's with all those
currentTransform.m##s? I'm glad you asked, sort of :]. These are CATransform3D properties that represent elements of a matrix that comprises a rectangular array of rows and columns.
To learn more about matrix transformations like those used in this example, check out 3DTransformFun project by fellow tutorial team member Rich Turton and Enter The Matrix project by Mark Pospesel.
Running the above code with
someView being a 250 x 250 view results in this: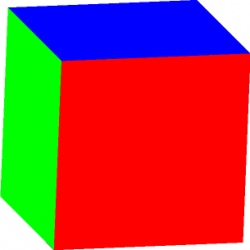
Now, try something: tap anywhere on the cube and "Transform layer tapped!" will print to the console.
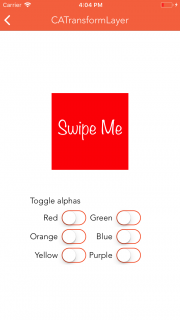
Layer Player includes switches to toggle the opacity of each sublayer, and the TrackBall utility from Bill Dudney, ported to Swift, which makes it easy to apply 3D transforms based on user gestures:
Example #10: CAEmitterLayer
CAEmitterLayer renders animated particles that are instances of CAEmitterCell. Both CAEmitterLayer and CAEmitterCell have properties to change rendering rate, size, shape, color, velocity, lifetime and more. Here's an example:import UIKit
class ViewController: UIViewController {
// 1
let emitterLayer = CAEmitterLayer()
let emitterCell = CAEmitterCell()
// 2
func setUpEmitterLayer() {
emitterLayer.frame = view.bounds
emitterLayer.seed = UInt32(Date().timeIntervalSince1970)
emitterLayer.renderMode = kCAEmitterLayerAdditive
emitterLayer.drawsAsynchronously = true
setEmitterPosition()
}
}
The above code prepares
emitterLayer:- Creates an emitter layer and cell.
- Sets up the emitter layer by doing the following:
- Provides a seed for the layer's random number generator that in turn randomizes certain properties of the layer's emitter cells, such as velocity. This is further explained in the next comment.
- Renders emitter cells above the layer's background color and border in an order specified by
renderMode. - Sets
drawsAsynchronouslytotrue, which may improve performance because the emitter layer must continuously redraw its emitter cells. - Next, the emitter position is set via a helper method. This is a good case study for how setting
drawsAsynchronouslytotruehas a positive effect on performance and smoothness of animation.
Finally, explaining the missing methods that setup
CAEmitterCell in ViewController:
Next, set up the emitter cell:.
func setUpEmitterCell() {
  emitterCell.contents = UIImage(named: "smallStar")?.cgImage

  emitterCell.velocity = 50.0
  emitterCell.velocityRange = 500.0

  emitterCell.color = UIColor.black.cgColor
  emitterCell.redRange = 1.0
  emitterCell.greenRange = 1.0
  emitterCell.blueRange = 1.0
  emitterCell.alphaRange = 0.0
  emitterCell.redSpeed = 0.0
  emitterCell.greenSpeed = 0.0
  emitterCell.blueSpeed = 0.0
  emitterCell.alphaSpeed = -0.5

  let zeroDegreesInRadians = degreesToRadians(0.0)
  emitterCell.spin = degreesToRadians(130.0)
  emitterCell.spinRange = zeroDegreesInRadians
  emitterCell.emissionRange = degreesToRadians(360.0)

  emitterCell.lifetime = 1.0
  emitterCell.birthRate = 250.0
  emitterCell.xAcceleration = -800.0
  emitterCell.yAcceleration = 1000.0
}
There's a lot of preparation in this method:
- It sets up the emitter cell by setting its contents to an image (this image is available in the Layer Player project).
- Then it specifies an initial velocity and max variance (
velocityRange); the emitter layer uses the aforementioned seed to create a random number generator that randomizes values within the range (initial value +/- the range value). This randomization happens for any properties ending inRange. - The color is set to black to allow the variance (discussed below) to vary from the default of white, because white results in overly bright particles.
- A series of color ranges are set next, using the same randomization as for
velocityRange, this time to specify the range of variance to each color. Speed values dictate how quickly each color can change over the lifetime of the cell. - Next, block three specifies how to distribute the cells around a full circular cone. More detail: It sets the emitter cell's spinning velocity and emission range. Furthermore, emission range determines how emitter cells are distributed around a cone that is defined by the
emissionRangespecified in radians. - Sets the cell's lifetime to 1 second. This property's default value is 0, so if you don't explicitly set this, your cells never appear! Same goes for
birthRate(per second); the default is 0, so this must be set to some positive number in order for cells to appear. - Lastly, cell x and y acceleration are set; these values affect the visual angle to which the particles emit.
Next, there are helper methods to convert degrees to radians and to set the emitter cell position to the midpoint of the view.
func setEmitterPosition() {
  emitterLayer.emitterPosition = CGPoint(x: view.bounds.midX, y: view.bounds.midY)
}

func degreesToRadians(_ degrees: Double) -> CGFloat {
  return CGFloat(degrees * Double.pi / 180.0)
}
Then set up the emitter layer and cell, and add that cell to the layer, and the layer to the view hierarchy.
override func viewDidLoad() {
  super.viewDidLoad()

  setUpEmitterLayer()
  setUpEmitterCell()
  emitterLayer.emitterCells = [emitterCell]
  view.layer.addSublayer(emitterLayer)
}
Finally, override
traitCollectionDidChange(_:):override func traitCollectionDidChange(_ previousTraitCollection: UITraitCollection?) {
setEmitterPosition()
}
This method provides a way to handle changes to the current trait collection, such as when the device is rotated. Not familiar with trait collections? Check out Section 1 of iOS 8 by Tutorials and you'll become a master of them :]
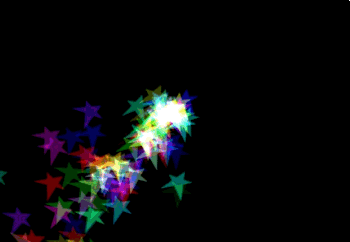
Here's the outcome of running the above code:
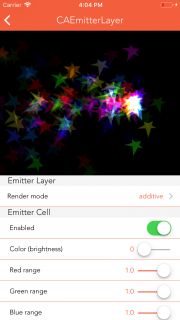
Layer Player includes controls to adjust all of the above-mentioned properties, and several more:
Where To Go From Here?
Congratulations! You have completed the great
CALayer Tour, and have seen 10 examples of how to use CALayer and its many subclasses. You can download the LayerPlayer project here, and you can download the completed first project here.
But don't stop here! Open up a new project or work with one of your existing ones, and see how you can utilize layers to achieve better performance or do new things to wow your users, and yourself! :]
As always, if you have any questions or comments about this article or working with layers, join in on the discussion below!

Comments
Post a Comment