Automatic image sliding is used by thousands of android applications which servers multiple type of contents distribution in their applications like E-Commerce applications. Image slider shows the exclusive products or their category to app user therefore they can easily understand the major category in application. The AndroidImageSlider library allows us to create awesome image slider in our android application within a few code integration.
Contents in this project Automatic Multiple Image Slider :
- Watch the demo video.
- Start a new project in Android Studio.
- Integrate the AndroidImageSlider libraries in your project.
- Add Internet permission in AndroidManifest.xml file.
- Adding SliderLayout in activity_main.xml file.
- Defining SliderLayout object in MainActivity.java file & assign there ID.
- Define HashMap .
- Creating + Calling Method to Add Image name and URL in HashMap .
- Complete final code for Android Image Slider Project.
1. Watch the demo video :
2. Start a new project in Android Studio :
Next step is to start a new android project or open an existing project in studio in which you want to add the Image Slider.
3. Integrate the AndroidImageSlider libraries in your project :
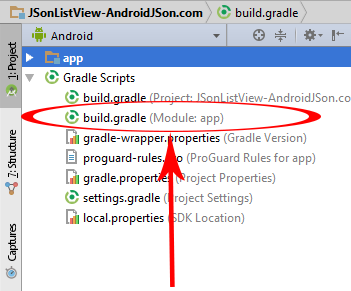
1. Open your project’s build.gradle(Module : app) file .
2. Add Picasso, Nineoldandroids and Image Slider library.
compile 'com.squareup.picasso:picasso:2.3.2'
compile 'com.nineoldandroids:library:2.4.0'
compile 'com.daimajia.slider:library:1.1.5@aar'
3. Screenshot after adding these libraries :

4. Add Internet permission in AndroidManifest.xml file.
<uses-permission android:name="android.permission.INTERNET"/>
5. Adding SliderLayout in activity_main.xml file.
<com.daimajia.slider.library.SliderLayout
    android:id="@+id/slider"
    android:layout_width="fill_parent"
    android:layout_height="300dp"/>
6. Defining SliderLayout object in MainActivity.java file & assign there ID.
SliderLayout sliderLayout ;

sliderLayout = (SliderLayout)findViewById(R.id.slider);
7. Define HashMap .
HashMap<String, String> HashMapForURL ;

HashMap<String, Integer> HashMapForLocalRes ;
8. Creating + Calling Method to Add Image name and URL in HashMap.
public void AddImagesUrlOnline(){

    HashMapForURL = new HashMap<String, String>();

    HashMapForURL.put("CupCake", "http://androidblog.esy.es/images/cupcake-1.png");
    HashMapForURL.put("Donut", "http://androidblog.esy.es/images/donut-2.png");
    HashMapForURL.put("Eclair", "http://androidblog.esy.es/images/eclair-3.png");
    HashMapForURL.put("Froyo", "http://androidblog.esy.es/images/froyo-4.png");
    HashMapForURL.put("GingerBread", "http://androidblog.esy.es/images/gingerbread-5.png");
}

public void AddImageUrlFormLocalRes(){

    HashMapForLocalRes = new HashMap<String, Integer>();

    HashMapForLocalRes.put("CupCake", R.drawable.cupcake);
    HashMapForLocalRes.put("Donut", R.drawable.donut);
    HashMapForLocalRes.put("Eclair", R.drawable.eclair);
    HashMapForLocalRes.put("Froyo", R.drawable.froyo);
    HashMapForLocalRes.put("GingerBread", R.drawable.gingerbread);

}
9. Complete final code for Android Image Slider Project.
Code for MainActivity.java file.
package com.androidjson.imageslider_androidjsoncom;
import android.support.v7.app.AppCompatActivity;
import android.os.Bundle;
import android.util.Log;
import android.widget.Toast;
import com.daimajia.slider.library.Animations.DescriptionAnimation;
import com.daimajia.slider.library.SliderLayout;
import com.daimajia.slider.library.SliderTypes.BaseSliderView;
import com.daimajia.slider.library.SliderTypes.TextSliderView;
import com.daimajia.slider.library.Tricks.ViewPagerEx;
import java.util.HashMap;

public class MainActivity extends AppCompatActivity
        implements BaseSliderView.OnSliderClickListener,
        ViewPagerEx.OnPageChangeListener
{

    SliderLayout sliderLayout ;

    HashMap<String, String> HashMapForURL ;

    HashMap<String, Integer> HashMapForLocalRes ;

    @Override
    protected void onCreate(Bundle savedInstanceState) {
        super.onCreate(savedInstanceState);
        setContentView(R.layout.activity_main);

        sliderLayout = (SliderLayout)findViewById(R.id.slider);

        //Call this method if you want to add images from URL .
        AddImagesUrlOnline();

        //Call this method to add images from local drawable folder .
        //AddImageUrlFormLocalRes();

        //Call this method to stop automatic sliding.
        //sliderLayout.stopAutoCycle();

        for(String name : HashMapForURL.keySet()){

            TextSliderView textSliderView = new TextSliderView(MainActivity.this);

            textSliderView
                    .description(name)
                    .image(HashMapForURL.get(name))
                    .setScaleType(BaseSliderView.ScaleType.Fit)
                    .setOnSliderClickListener(this);

            textSliderView.bundle(new Bundle());

            textSliderView.getBundle()
                    .putString("extra",name);

            sliderLayout.addSlider(textSliderView);
        }
        sliderLayout.setPresetTransformer(SliderLayout.Transformer.DepthPage);

        sliderLayout.setPresetIndicator(SliderLayout.PresetIndicators.Center_Bottom);

        sliderLayout.setCustomAnimation(new DescriptionAnimation());

        sliderLayout.setDuration(3000);

        sliderLayout.addOnPageChangeListener(MainActivity.this);
    }

    @Override
    protected void onStop() {

        sliderLayout.stopAutoCycle();

        super.onStop();
    }

    @Override
    public void onSliderClick(BaseSliderView slider) {

        Toast.makeText(this,slider.getBundle().get("extra") + "", Toast.LENGTH_SHORT).show();
    }

    @Override
    public void onPageScrolled(int position, float positionOffset, int positionOffsetPixels) {}

    @Override
    public void onPageSelected(int position) {

        Log.d("Slider Demo", "Page Changed: " + position);

    }

    @Override
    public void onPageScrollStateChanged(int state) {

    }

    public void AddImagesUrlOnline(){

        HashMapForURL = new HashMap<String, String>();

        HashMapForURL.put("CupCake", "http://androidblog.esy.es/images/cupcake-1.png");
        HashMapForURL.put("Donut", "http://androidblog.esy.es/images/donut-2.png");
        HashMapForURL.put("Eclair", "http://androidblog.esy.es/images/eclair-3.png");
        HashMapForURL.put("Froyo", "http://androidblog.esy.es/images/froyo-4.png");
        HashMapForURL.put("GingerBread", "http://androidblog.esy.es/images/gingerbread-5.png");
    }

    public void AddImageUrlFormLocalRes(){

        HashMapForLocalRes = new HashMap<String, Integer>();

        HashMapForLocalRes.put("CupCake", R.drawable.cupcake);
        HashMapForLocalRes.put("Donut", R.drawable.donut);
        HashMapForLocalRes.put("Eclair", R.drawable.eclair);
        HashMapForLocalRes.put("Froyo", R.drawable.froyo);
        HashMapForLocalRes.put("GingerBread", R.drawable.gingerbread);

    }
}
Code for AndroidManifest.xml file .
<?xml version="1.0" encoding="utf-8"?>
<manifest xmlns:android="http://schemas.android.com/apk/res/android"
    package="com.androidjson.imageslider_androidjsoncom">

    <uses-permission android:name="android.permission.INTERNET"/>

    <application
        android:allowBackup="true"
        android:icon="@mipmap/ic_launcher"
        android:label="@string/app_name"
        android:supportsRtl="true"
        android:theme="@style/AppTheme">
        <activity android:name=".MainActivity">
            <intent-filter>
                <action android:name="android.intent.action.MAIN" />

                <category android:name="android.intent.category.LAUNCHER" />
            </intent-filter>
        </activity>
    </application>

</manifest>
Screenshot:


Comments
Post a Comment