Navigation Drawer is an important feature of any android app. Its need is when you navigate some particular pages of your app. In new android support design library, Navigation View is officially released, before we used Navigation Drawer. Let’s create Navigation View. First Create New Project
Add this library to app’s build.gradle file in dependencies and click sync now:
Add this library to app’s build.gradle file in dependencies and click sync now:
compile 'com.android.support:design:23.1.0'
Now change to your layout file’s content as below where you want to add drawer: activity_main.xml
<?xml version="1.0" encoding="utf-8"?>
<android.support.v4.widget.DrawerLayout xmlns:android="http://schemas.android.com/apk/res/android"
android:id="@+id/drawer_layout"
android:layout_width="match_parent"
android:layout_height="match_parent"
android:fitsSystemWindows="true">
<LinearLayout
android:layout_width="match_parent"
android:layout_height="match_parent"
android:orientation="vertical"><include layout="@layout/app_bar" /><FrameLayout
android:id="@+id/content"
android:layout_width="match_parent"
android:layout_height="match_parent" /></LinearLayout><android.support.design.widget.NavigationView
android:id="@+id/navigationView"
android:layout_width="wrap_content"
android:layout_height="match_parent"
android:layout_gravity="start"/>
</android.support.v4.widget.DrawerLayout>
Here you can see 4 content:
- Drawer Layout widget
- include app-bar (Toolbar)
- Frame Layout where actual fragment to be replaced. Later I’ll explain about that
- Navigation View that is drawer
app_bar.xml (for toolbar)
<?xml version="1.0" encoding="utf-8"?>
<android.support.v7.widget.Toolbar xmlns:android="http://schemas.android.com/apk/res/android"
xmlns:app="http://schemas.android.com/apk/res-auto"
android:id="@+id/toolbar"
android:layout_width="match_parent"
android:layout_height="?attr/actionBarSize"
android:background="@color/colorPrimary"
android:gravity="center_vertical"
android:title=""
app:layout_collapseMode="pin"
app:layout_scrollFlags="scroll|enterAlways"
app:theme="@style/MyToolbarTheme">
</android.support.v7.widget.Toolbar>
style.xml
<resources><style name="AppTheme" parent="Theme.AppCompat.Light.NoActionBar">
<item name="colorPrimary">@color/colorPrimary</item>
<item name="colorPrimaryDark">@color/colorPrimaryDark</item>
<item name="colorAccent">@color/colorAccent</item>
</style><style name="MyToolbarTheme" parent="@style/ThemeOverlay.AppCompat.Dark">
<item name="colorControlNormal">@color/white</item>
<item name="titleTextColor">@color/white</item>
</style></resources>
Define each attribute to java file:
private Toolbar toolbar;
private DrawerLayout drawerLayout;
private ActionBarDrawerToggle drawerToggle;
private NavigationView navigationView;
Define each one:
drawerLayout = (DrawerLayout) findViewById(R.id.drawer_layout);
navigationView = (NavigationView) findViewById(R.id.navigationView);
toolbar = findViewById(R.id.toolbar);
setSupportActionBar(toolbar);
Create one method in onCreate(), named initDrawer() and in method, do below code that is related to drawer:
private void initDrawer() {
drawerToggle = new ActionBarDrawerToggle(this, drawerLayout, toolbar, R.string.drawer_open, R.string.drawer_close) {
@Override
public void onDrawerClosed(View drawerView) {
super.onDrawerClosed(drawerView);
}
@Override
public void onDrawerOpened(View drawerView) {
super.onDrawerOpened(drawerView);
}
};
drawerLayout.addDrawerListener(drawerToggle);
}
Override below methods that is necessary to put drawer hamburger icon and its click:
@Override
protected void onPostCreate(Bundle savedInstanceState) {
super.onPostCreate(savedInstanceState);
drawerToggle.syncState();
}
@Override
public void onConfigurationChanged(Configuration newConfig) {
super.onConfigurationChanged(newConfig);
drawerToggle.onConfigurationChanged(newConfig);
}@Override
public boolean onOptionsItemSelected(MenuItem item) {
switch (item.getItemId()) {
case android.R.id.home:
drawerLayout.openDrawer(GravityCompat.START);
return true;
}
return super.onOptionsItemSelected(item);
}
Now run project, below will be your output:

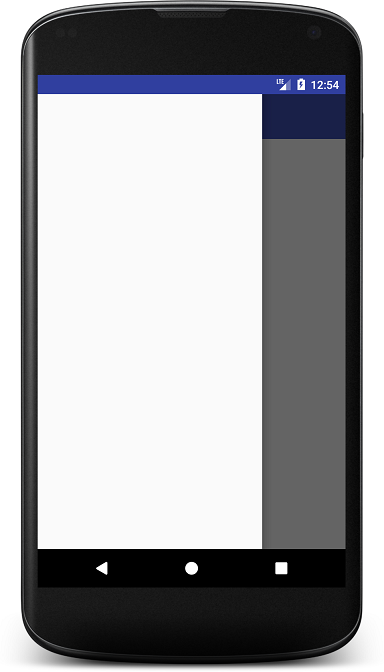
You can check by clicking drawer hamburger icon, finally drawer comes up. :)
But its remaining to put contents in drawer.
Here I want to tell you one thing that, when you click any item from navigation view, it redirects to the fragment only as per android standards otherwise you can do anything on item click, either any operation or redirecting to activity or fragment.
Now add contents in Drawer:
Create one menu drawable in res->menu, named drawer_menu.xml as like below:
Create one menu drawable in res->menu, named drawer_menu.xml as like below:
<menu xmlns:android=”http://schemas.android.com/apk/res/android" xmlns:tools=”http://schemas.android.com/tools" tools:context=”.MainActivity”><group android:id="@+id/group1" android:checkableBehavior="single"> <item android:id="@+id/drawer_home" android:title="Home" /> <item android:id="@+id/drawer_fav" android:title="Favorite" /><item android:id="@+id/drawer_notification" android:title="Notification" /><item android:id="@+id/drawer_logout" android:title="Logout" /> </group>
</menu>
You can customize menu item like this:
android:icon="@drawable/ic_home"
And in activity_main.xml, under Navigation View add menu attribute like this:
<android.support.design.widget.NavigationView
android:id="@+id/navigationView"
android:layout_width="wrap_content"
android:layout_height="match_parent"
app:menu="@menu/drawer_menu"
app:itemIconTint="@color/black"
app:itemTextColor="@color/black"
android:layout_gravity="start" />
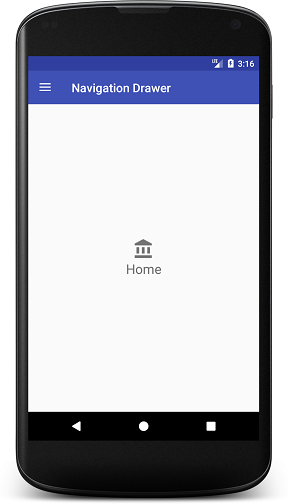
Here’s the output:

Remember, we put one FrameLayout in activity_main layout. So whenever we redirect to any fragment from Navigation View, we replace to this frame to the explicit Fragment where we want to redirect.
Now we create one blank fragment named HomeFragment with layout , as for first time, replace with frame.
HomeFragment.java
public class HomeFragment extends Fragment {public static HomeFragment newInstance() { HomeFragment fragment = new HomeFragment(); return fragment; } public HomeFragment() { // Required empty public constructor } @Override public void onCreate(Bundle savedInstanceState) { super.onCreate(savedInstanceState); }@Override public View onCreateView(LayoutInflater inflater, ViewGroup container, Bundle savedInstanceState) { // Inflate the layout for this fragment return inflater.inflate(R.layout.fragment_home, container, false); } }
fragment_home.xml
<?xml version="1.0" encoding="utf-8"?><LinearLayout xmlns:android="http://schemas.android.com/apk/res/android"
android:layout_width="wrap_content"
android:layout_height="wrap_content"
android:layout_centerInParent="true"
android:layout_gravity="center"
android:gravity="center"
android:orientation="vertical">
<ImageView
android:layout_width="36dp"
android:layout_height="36dp'
android:layout_centerInParent="true"
android:src="@drawable/ic_action_home" /><TextView
android:layout_width="wrap_content"
android:layout_height="wrap_content"
android:text="Home"
android:textSize="22sp" /></LinearLayout>
Now add this code that replace to your frame-layout content, below initDrawer() called:
FragmentManager manager = getSupportFragmentManager();
FragmentTransaction ft = manager.beginTransaction();
ft.replace(R.id.content, new HomeFragment());
ft.commit();
Now run project, your output will be like this:
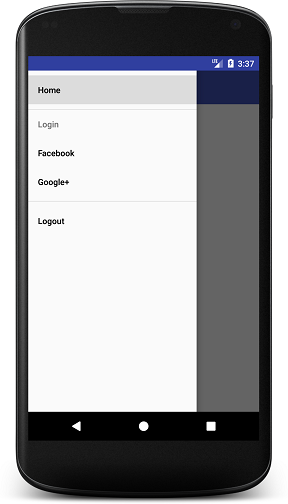
Now If you want to do grouping with more many items in sections, your drawer_items menu file like this:
<menu xmlns:android="http://schemas.android.com/apk/res/android" xmlns:tools="http://schemas.android.com/tools" tools:context=".MainActivity”><group android:id="@+id/group1" android:checkableBehavior="single"> <item android:id="@+id/drawer_home" android:checked="true" android:title="Home" /> </group>
<group
 android:id="@+id/group2"
 android:checkableBehavior="single">
 <item android:title="Login">
 <menu>
 <group android:checkableBehavior="single">
 <item
 android:id="@+id/drawer_fb"
 android:title="Facebook" />
 <item
 android:id="@+id/drawer_gplus"
 android:title="Google+" />
 </group>
 </menu>
 </item>
</group>
<group
 android:id="@+id/group3"
 android:checkableBehavior="single">
 <item
 android:id="@+id/drawer_logout"
 android:title="Logout" />
</group>
</menu>
So drawer would be like this:
Now add NavigationView item click event.
navigationView.setNavigationItemSelectedListener(new NavigationView.OnNavigationItemSelectedListener() {
@Override
public boolean onNavigationItemSelected(MenuItem menuItem) {
setDrawerClick(menuItem.getItemId());
menuItem.setChecked(true);
drawerLayout.closeDrawers();
return true;
}
});
And add implement method setDrawerClick(menuItem.getItemId());
private void setDrawerClick(int itemId) { switch (itemId) { case R.id.drawer_home: Toast.makeText(this, "Home", Toast.LENGTH_SHORT).show(); break;case R.id.drawer_fav: Toast.makeText(this, "Favorite", Toast.LENGTH_SHORT).show(); break;case R.id.drawer_notification: Toast.makeText(this, "Notification", Toast.LENGTH_SHORT).show(); break;case R.id.drawer_logout: Toast.makeText(this, "Logout", Toast.LENGTH_SHORT).show(); break; } }
Now if you want to redirect different fragments on each item click, create method for redirect to fragment like this:
private void redirectToFragment(Fragment fragment){
FragmentManager manager = getSupportFragmentManager();
FragmentTransaction ft = manager.beginTransaction();
ft.replace(R.id.content, fragment);
ft.commit();
}
and call this method from different click as below:
redirectToFragment(new HomeFragment());
redirectToFragment(new NotificationFragment());
redirectToFragment(new FavoriteFragment()); 
Comments
Post a Comment