https://stackoverflow.com/questions/37072902/android-tablayout-select-first-tab-on-startup
d
https://abhiandroid.com/materialdesign/tablayout-example-android-studio.html

@Override
    protected void onResume() {
        super.onResume();
        mTabLayout.getTabAt(1).select();
        mTabLayout.getTabAt(0).select();
}d
https://abhiandroid.com/materialdesign/tablayout-example-android-studio.html
Example 1 of TabLayout:
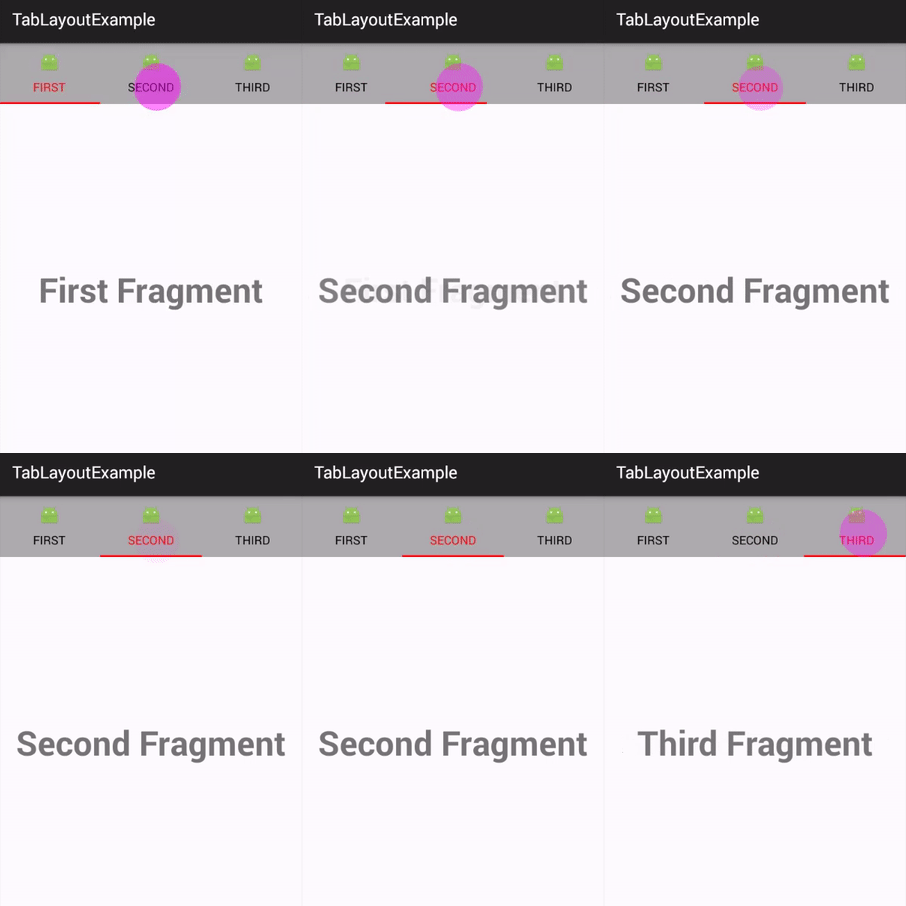
Below is the first example of TabLayout in which we display three non-sliding tabs. In this example we define a TabLayout and a FrameLayout in our xml file. In this example we create and add 3 tabs in the TabLayout with the help of different methods of TabLayout. After that we implement setOnTabSelectedListener event and replace the FrameLayout with the fragment’s according to selected tab.

Step 1: Create a new project and name it TabLayoutExample
Step 2: Open build.gradle and add Design support library dependency.
apply plugin: 'com.android.application'

android {
compileSdkVersion 23
buildToolsVersion "23.0.2"

defaultConfig {
applicationId "com.abhiandroid.tablayoutexample"
minSdkVersion 15
targetSdkVersion 23
versionCode 1
versionName "1.0"
}
buildTypes {
release {
minifyEnabled false
proguardFiles getDefaultProguardFile('proguard-android.txt'), 'proguard-rules.pro'
}
}
}

dependencies {
compile fileTree(dir: 'libs', include: ['*.jar'])
compile 'com.android.support:appcompat-v7:23.1.0'
compile 'com.android.support:design:23.1.0' // design support library
}
Step 3: Open res -> layout ->activity_main.xml (or) main.xml and add following code:
In this step we add the code for displaying TabLayout and ViewPager in our xml file.
<LinearLayout xmlns:android="http://schemas.android.com/apk/res/android"
xmlns:app="http://schemas.android.com/apk/res-auto"
xmlns:tools="http://schemas.android.com/tools"
android:layout_width="match_parent"
android:layout_height="match_parent"
android:orientation="vertical"
tools:context=".MainActivity">

<android.support.design.widget.TabLayout
android:id="@+id/simpleTabLayout"
android:layout_width="match_parent"
android:layout_height="wrap_content"
app:tabBackground="@android:color/darker_gray"
app:tabIndicatorColor="#f00"
app:tabSelectedTextColor="#f00"
app:tabTextColor="#000" />

<FrameLayout
android:id="@+id/simpleFrameLayout"
android:layout_width="match_parent"
android:layout_height="match_parent" />

</LinearLayout>
Step4: Open src -> package -> MainActivity.java
In this step we open MainActivity and add the code for initiate the FrameLayout and TabLayout. After that we create and add 3 tabs in the TabLayout. Finally we implement setOnTabSelectedListener event and replace the FrameLayout with the fragment’s according to selected tab.
package com.abhiandroid.tablayoutexample;

import android.os.Bundle;
import android.support.design.widget.TabLayout;
import android.support.v4.app.Fragment;
import android.support.v4.app.FragmentManager;
import android.support.v4.app.FragmentTransaction;
import android.support.v7.app.AppCompatActivity;
import android.widget.FrameLayout;

public class MainActivity extends AppCompatActivity {

FrameLayout simpleFrameLayout;
TabLayout tabLayout;

@Override
protected void onCreate(Bundle savedInstanceState) {
super.onCreate(savedInstanceState);
setContentView(R.layout.activity_main);
// get the reference of FrameLayout and TabLayout
simpleFrameLayout = (FrameLayout) findViewById(R.id.simpleFrameLayout);
tabLayout = (TabLayout) findViewById(R.id.simpleTabLayout);
// Create a new Tab named "First"
TabLayout.Tab firstTab = tabLayout.newTab();
firstTab.setText("First"); // set the Text for the first Tab
firstTab.setIcon(R.drawable.ic_launcher); // set an icon for the
// first tab
tabLayout.addTab(firstTab); // add  the tab at in the TabLayout
// Create a new Tab named "Second"
TabLayout.Tab secondTab = tabLayout.newTab();
secondTab.setText("Second"); // set the Text for the second Tab
secondTab.setIcon(R.drawable.ic_launcher); // set an icon for the second tab
tabLayout.addTab(secondTab); // add  the tab  in the TabLayout
// Create a new Tab named "Third"
TabLayout.Tab thirdTab = tabLayout.newTab();
thirdTab.setText("Third"); // set the Text for the first Tab
thirdTab.setIcon(R.drawable.ic_launcher); // set an icon for the first tab
tabLayout.addTab(thirdTab); // add  the tab at in the TabLayout


// perform setOnTabSelectedListener event on TabLayout
tabLayout.setOnTabSelectedListener(new TabLayout.OnTabSelectedListener() {
@Override
public void onTabSelected(TabLayout.Tab tab) {
// get the current selected tab's position and replace the fragment accordingly
Fragment fragment = null;
switch (tab.getPosition()) {
case 0:
fragment = new FirstFragment();
break;
case 1:
fragment = new SecondFragment();
break;
case 2:
fragment = new ThirdFragment();
break;
}
FragmentManager fm = getSupportFragmentManager();
FragmentTransaction ft = fm.beginTransaction();
ft.replace(R.id.simpleFrameLayout, fragment);
ft.setTransition(FragmentTransaction.TRANSIT_FRAGMENT_OPEN);
ft.commit();
}

@Override
public void onTabUnselected(TabLayout.Tab tab) {

}

@Override
public void onTabReselected(TabLayout.Tab tab) {

}
});
}
}
Step 5: Now we need 3 fragments and 3 xml layouts for three tabs. So create three fragments by right click on your package folder and create classes and name them as FirstFragment, SecondFragment and ThirdFragment and add the following code respectively.
FirstFragment.class
package com.abhiandroid.tablayoutexample;

import android.os.Bundle;
import android.support.v4.app.Fragment;
import android.view.LayoutInflater;
import android.view.View;
import android.view.ViewGroup;

public class FirstFragment extends Fragment {

public FirstFragment() {
// Required empty public constructor
}

@Override
public void onCreate(Bundle savedInstanceState) {
super.onCreate(savedInstanceState);
}

@Override
public View onCreateView(LayoutInflater inflater, ViewGroup container,
Bundle savedInstanceState) {
// Inflate the layout for this fragment
return inflater.inflate(R.layout.fragment_first, container, false);
}

}
SecondFragment.class
package com.abhiandroid.tablayoutexample;

import android.os.Bundle;
import android.support.v4.app.Fragment;
import android.view.LayoutInflater;
import android.view.View;
import android.view.ViewGroup;

public class SecondFragment extends Fragment {

public SecondFragment() {
// Required empty public constructor
}

@Override
public void onCreate(Bundle savedInstanceState) {
super.onCreate(savedInstanceState);
}

@Override
public View onCreateView(LayoutInflater inflater, ViewGroup container,
Bundle savedInstanceState) {
// Inflate the layout for this fragment
return inflater.inflate(R.layout.fragment_second, container, false);
}

}
ThirdFragment.class
package com.abhiandroid.tablayoutexample;

import android.os.Bundle;
import android.support.v4.app.Fragment;
import android.view.LayoutInflater;
import android.view.View;
import android.view.ViewGroup;

public class ThirdFragment extends Fragment {

public ThirdFragment() {
// Required empty public constructor
}

@Override
public void onCreate(Bundle savedInstanceState) {
super.onCreate(savedInstanceState);
}

@Override
public View onCreateView(LayoutInflater inflater, ViewGroup container,
Bundle savedInstanceState) {
// Inflate the layout for this fragment
return inflater.inflate(R.layout.fragment_third, container, false);
}

}
Step 6: Now create 3 xml layouts by right clicking on res/layout -> New -> Layout Resource File and name them as fragment_first, fragment_second and fragment_third and add the following code in respective files.
Here we will design the basic simple UI for all the three tabs.
fragment_first.xml
<RelativeLayout xmlns:android="http://schemas.android.com/apk/res/android"
xmlns:tools="http://schemas.android.com/tools"
android:layout_width="match_parent"
android:layout_height="match_parent"
tools:context="info.androidhive.materialtabs.fragments.OneFragment">

<TextView
android:layout_width="wrap_content"
android:layout_height="wrap_content"
android:layout_centerInParent="true"
android:text="First Fragment"
android:textSize="40dp"
android:textStyle="bold" />

</RelativeLayout>
fragment_second.xml
<RelativeLayout xmlns:android="http://schemas.android.com/apk/res/android"
xmlns:tools="http://schemas.android.com/tools"
android:layout_width="match_parent"
android:layout_height="match_parent"
tools:context="info.androidhive.materialtabs.fragments.OneFragment">

<TextView
android:layout_width="wrap_content"
android:layout_height="wrap_content"
android:layout_centerInParent="true"
android:text="Second Fragment"
android:textSize="40dp"
android:textStyle="bold" />

</RelativeLayout>
fragment_third.xml
<RelativeLayout xmlns:android="http://schemas.android.com/apk/res/android"
xmlns:tools="http://schemas.android.com/tools"
android:layout_width="match_parent"
android:layout_height="match_parent"
tools:context="info.androidhive.materialtabs.fragments.OneFragment">

<TextView
android:layout_width="wrap_content"
android:layout_height="wrap_content"
android:layout_centerInParent="true"
android:text="Third Fragment"
android:textSize="40dp"
android:textStyle="bold" />

</RelativeLayout>

Comments
Post a Comment