https://www.javahelps.com/2018/12/access-mysql-from-android-through.html
Finally, I found some time to write about accessing MySQL or any database that you can think about from an Android application. Android offers a built-in database known as SQLite which is supposed to be used for local data storage. For example, if you want to store your recent transactions locally in the device, you have to go with SQLite. I have already written a few articles on how to use SQLite database in Android. However, enterprise mobile applications often depend on client/server databases such as MySQL, Oracle DB or MongoDB. Whatever the database, you have chosen, the way to access them from an Android application is pretty same. In this article, I explain how to access a MySQL database from an Android application written in Kotlin.
I will use Kotlin for all upcoming Android tutorials because it is the future of Android programming. Kotlin is a JVM based language and you can easily convert a Kotlin project into Java and vice versa.
An Android application is not supposed to directly access a database deployed in a server. I do not recommend implementing JDBC connections in an Android application due to the tight coupling introduced between the application and the database. The industrial best practice requires you to implement a web service between the database and the Android application. Having a web service layer reduces the complexity of the Android application and also reduces the dependency on database specific operations. Therefore, the problem of accessing a client/server database like MySQL from an Android application can be defined as the problem of consuming a web service hosted somewhere.
Having said that, as an Android developer, you don't need to care about what is behind the web service. It may be a MySQL database, MongoDB database, a Social Media network or even a Weather Network API. What you need is the API endpoints exposed by the web service. In this article, I only explain how to connect to a web service hosted on your local machine from an Android application. However, the sample web service used in this article provides API endpoints to CRUD operations on a MySQL database. Please follow the RESTful CRUD With Java and MySQL in Minutes article and develop the web service to access a MySQL database. In the following section, you will learn how to access the web service you have created for accessing a database.
Step 1:
I am repeating again! Follow the RESTful CRUD With Java and MySQL in Minutes article and start the web service you have developed. Please make sure that your web service is up and running as expected using Postman.
As you can see in Step 12 of the above article, this web service offers the following API endpoints:
In the following steps, we will develop an Android application in Kotlin to access these endpoints using Retrofit HTTP Clientand ReactiveX Asynchronous Library.
Step 2:
Create an Android application with an Empty Activity. Use the application name: "User Management" and the company domain: com.javahelps. Do not forget to check "Include Kotlin support".
Step 3:
As I mentioned in Step 1, we depend on some external libraries in order to access the web service. Add these dependencies to your app.gradle file.
Step 4:
We are developing an application to access web services through the Internet. Therefore, we need
Step 5:
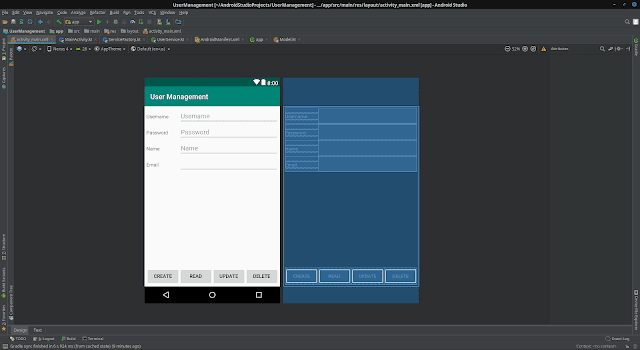
Open the activity_main.xml file and modify the content as given below. The following code creates four text fields for Username, Password, Name, and Email address along with four buttons to Create, Read, Update and Delete users. You will get error notifications under every android:onClick="deleteUser" statements. It will be gone once we create those methods in MainActivity.kt.
Step 6:
Create a new package service under the com.javahelps.usermanagement package.
Step 7:
Create a new Object named Model inside the com.javahelps.usermanagement.service package with the following code:
Step 8:
Create UserService.kt interface in the same package with the following code:
Step 9:
Create ServiceFactory.kt class in the same package. If you followed the Step 13 in the RESTful CRUD With Java and MySQL in Minutes article and implemented the Basic authentication, modify the class as given below.
The build method is used to build a service client using the interface we created in Step 8. I created such a generic method assuming we may have several service interfaces. However, we will call this method only once with the UserService class in the next step.
Step 10:
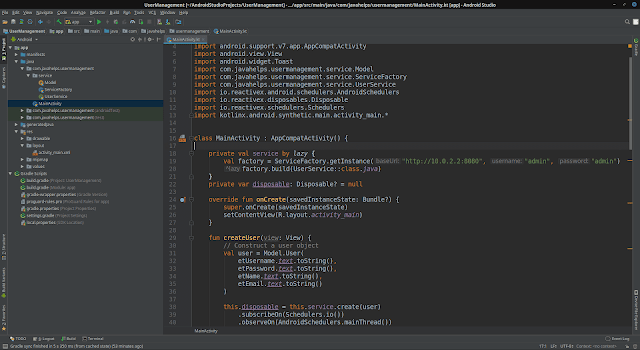
Create a service reference in the MainActivity.kt class and lazily initialize it as shown below. Also, create the disposable variable which we will use later.
Step 11:
We are almost set. Now we need to create Button click event handlers for all the buttons we have created in Step 5. First of all, create a helper function named
Similarly, create the
Step 12:
You may have noticed that all our CRUD functions in Step 11, assign their last statement to the disposable variable. Note that we call the service asynchronously in a fire and forget manner. The user may exit the application immediately after clicking a button. In such a scenario, we should stop waiting for the result. Therefore, override the onPause function and call the disposable.dispose function.
Step 13:
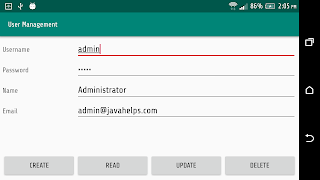
Time to test your application! Save all changes; Make sure that the web service is up and running; Run the Android application. Once your application is running, enter the username admin and try to read the complete user information.
If everything works as expected, congratulations! You have successfully accessed a MySQL database through a REST web service. You can apply the same logic for any web service access from an Android application. If you have any issues, feel free to comment below.
Find the project @ Git Hub.
Having said that, as an Android developer, you don't need to care about what is behind the web service. It may be a MySQL database, MongoDB database, a Social Media network or even a Weather Network API. What you need is the API endpoints exposed by the web service. In this article, I only explain how to connect to a web service hosted on your local machine from an Android application. However, the sample web service used in this article provides API endpoints to CRUD operations on a MySQL database. Please follow the RESTful CRUD With Java and MySQL in Minutes article and develop the web service to access a MySQL database. In the following section, you will learn how to access the web service you have created for accessing a database.
Step 1:
I am repeating again! Follow the RESTful CRUD With Java and MySQL in Minutes article and start the web service you have developed. Please make sure that your web service is up and running as expected using Postman.
As you can see in Step 12 of the above article, this web service offers the following API endpoints:
| HTTP Method | URL | Input | Description |
|---|---|---|---|
| POST | http://localhost:8080/users | application/json | Create a new user admin |
| GET | http://localhost:8080/users | N/A | Read all users |
| GET | http://localhost:8080/users/admin | Path parameter (Note the URL ending with admin) | Read the user with username 'admin' |
| PUT | http://localhost:8080/users/admin | Path parameter (Note the URL ending with admin) application/json | Update the user admin |
| DELETE | http://localhost:8080/users/admin | Path parameter (Note the URL ending with admin) | Delete the user with username 'admin' |
Step 2:
Create an Android application with an Empty Activity. Use the application name: "User Management" and the company domain: com.javahelps. Do not forget to check "Include Kotlin support".
Step 3:
As I mentioned in Step 1, we depend on some external libraries in order to access the web service. Add these dependencies to your app.gradle file.
implementation 'com.squareup.retrofit2:retrofit:2.5.0'
implementation 'com.squareup.retrofit2:converter-gson:2.5.0'
implementation 'com.squareup.retrofit2:adapter-rxjava2:2.5.0'
implementation 'io.reactivex.rxjava2:rxandroid:2.1.0'apply plugin: 'com.android.application'
apply plugin: 'kotlin-android'
apply plugin: 'kotlin-android-extensions'
android {
compileSdkVersion 28
defaultConfig {
applicationId "com.javahelps.usermanagement"
minSdkVersion 15
targetSdkVersion 28
versionCode 1
versionName "1.0"
testInstrumentationRunner "android.support.test.runner.AndroidJUnitRunner"
}
buildTypes {
release {
minifyEnabled false
proguardFiles getDefaultProguardFile('proguard-android.txt'), 'proguard-rules.pro'
}
}
}
dependencies {
implementation fileTree(dir: 'libs', include: ['*.jar'])
implementation "org.jetbrains.kotlin:kotlin-stdlib-jdk7:$kotlin_version"
implementation 'com.android.support:appcompat-v7:28.0.0'
implementation 'com.android.support.constraint:constraint-layout:1.1.3'
implementation 'com.squareup.retrofit2:retrofit:2.5.0'
implementation 'com.squareup.retrofit2:converter-gson:2.5.0'
implementation 'com.squareup.retrofit2:adapter-rxjava2:2.5.0'
implementation 'io.reactivex.rxjava2:rxandroid:2.1.0'
testImplementation 'junit:junit:4.12'
androidTestImplementation 'com.android.support.test:runner:1.0.2'
androidTestImplementation 'com.android.support.test.espresso:espresso-core:3.0.2'
}Step 4:
We are developing an application to access web services through the Internet. Therefore, we need
android.permission.INTERNETpermission to be added to the AndroidManifest.xml file. The AndroidManifest.xml file should look like the following code after the modification.<?xml version="1.0" encoding="utf-8"?>
<manifest xmlns:android="http://schemas.android.com/apk/res/android"
package="com.javahelps.usermanagement">
<application
android:allowBackup="true"
android:icon="@mipmap/ic_launcher"
android:label="@string/app_name"
android:roundIcon="@mipmap/ic_launcher_round"
android:supportsRtl="true"
android:theme="@style/AppTheme">
<activity android:name=".MainActivity">
<intent-filter>
<action android:name="android.intent.action.MAIN"/>
<category android:name="android.intent.category.LAUNCHER"/>
</intent-filter>
</activity>
</application>
<uses-permission android:name="android.permission.INTERNET"/>
</manifest>Step 5:
Open the activity_main.xml file and modify the content as given below. The following code creates four text fields for Username, Password, Name, and Email address along with four buttons to Create, Read, Update and Delete users. You will get error notifications under every android:onClick="deleteUser" statements. It will be gone once we create those methods in MainActivity.kt.
<?xml version="1.0" encoding="utf-8"?>
<android.support.constraint.ConstraintLayout
        xmlns:android="http://schemas.android.com/apk/res/android"
        xmlns:tools="http://schemas.android.com/tools"
        xmlns:app="http://schemas.android.com/apk/res-auto"
        android:layout_width="match_parent"
        android:layout_height="match_parent"
        tools:context=".MainActivity">

    <TableLayout
            android:layout_width="match_parent"
            android:layout_height="wrap_content"
            android:layout_margin="5dp"
            app:layout_constraintTop_toTopOf="parent">

        <TableRow
                android:layout_width="match_parent"
                android:layout_height="match_parent">

            <TextView
                    android:text="Username"
                    android:layout_width="0dp"
                    android:layout_weight="1"
                    android:layout_height="wrap_content"
                    android:id="@+id/txtUsername"/>

            <EditText
                    android:layout_width="0dp"
                    android:layout_weight="3"
                    android:layout_height="wrap_content"
                    android:hint="Username"
                    android:textAllCaps="false"
                    android:ems="10"
                    android:id="@+id/etUsername"/>
        </TableRow>

        <TableRow
                android:layout_width="match_parent"
                android:layout_height="match_parent">

            <TextView
                    android:text="Password"
                    android:layout_width="0dp"
                    android:layout_weight="1"
                    android:layout_height="wrap_content"
                    android:id="@+id/txtPassword"/>

            <EditText
                    android:layout_width="0dp"
                    android:layout_weight="3"
                    android:layout_height="wrap_content"
                    android:inputType="textPassword"
                    android:ems="10"
                    android:hint="Password"
                    android:id="@+id/etPassword"/>
        </TableRow>

        <TableRow
                android:layout_width="match_parent"
                android:layout_height="match_parent">

            <TextView
                    android:text="Name"
                    android:layout_width="0dp"
                    android:layout_weight="1"
                    android:layout_height="wrap_content"
                    android:id="@+id/txtName"/>

            <EditText
                    android:layout_width="0dp"
                    android:layout_weight="3"
                    android:layout_height="wrap_content"
                    android:inputType="textPersonName"
                    android:hint="Name"
                    android:ems="10"
                    android:id="@+id/etName"/>
        </TableRow>

        <TableRow
                android:layout_width="match_parent"
                android:layout_height="match_parent">

            <TextView
                    android:text="Email"
                    android:layout_width="0dp"
                    android:hint="Email"
                    android:layout_weight="1"
                    android:layout_height="wrap_content"
                    android:id="@+id/txtEmail"/>

            <EditText
                    android:layout_width="0dp"
                    android:layout_weight="3"
                    android:layout_height="wrap_content"
                    android:inputType="textEmailAddress"
                    android:ems="10"
                    android:id="@+id/etEmail"/>
        </TableRow>
    </TableLayout>

    <LinearLayout
            android:layout_width="match_parent"
            android:layout_margin="5dp"
            app:layout_constraintBottom_toBottomOf="parent"
            android:layout_height="wrap_content">

        <Button
                android:text="Create"
                android:layout_width="0dp"
                android:layout_weight="1"
                android:layout_height="wrap_content"
                android:onClick="createUser"
                android:id="@+id/btnCreate"/>

        <Button
                android:text="Read"
                android:layout_width="0dp"
                android:layout_weight="1"
                android:layout_height="wrap_content"
                android:onClick="readUser"
                android:id="@+id/btnRead"/>

        <Button
                android:text="Update"
                android:layout_width="0dp"
                android:layout_weight="1"
                android:layout_height="wrap_content"
                android:onClick="updateUser"
                android:id="@+id/btnUpdate"/>

        <Button
                android:text="Delete"
                android:layout_width="0dp"
                android:layout_weight="1"
                android:layout_height="wrap_content"
                android:onClick="deleteUser"
                android:id="@+id/btnDelete"/>
    </LinearLayout>
</android.support.constraint.ConstraintLayout>
Step 6:
Create a new package service under the com.javahelps.usermanagement package.
Step 7:
Create a new Object named Model inside the com.javahelps.usermanagement.service package with the following code:
package com.javahelps.usermanagement.service

object Model {
    data class User(val username: String, val password: String, val name: String, val email: String)
}Create UserService.kt interface in the same package with the following code:
package com.javahelps.usermanagement.service

import com.javahelps.usermanagement.service.Model.User
import io.reactivex.Observable
import retrofit2.Response
import retrofit2.http.*

interface UserService {

    @POST("users")
    fun create(@Body user: User): Observable<User>

    @GET("users/{username}")
    fun read(@Path("username") username: String): Observable<User>

    @PUT("users/{username}")
    fun update(@Path("username") username: String, @Body user: User): Observable<User>

    @DELETE("users/{username}")
    fun delete(@Path("username") username: String): Observable<Response<Void>>
}Step 9:
Create ServiceFactory.kt class in the same package. If you followed the Step 13 in the RESTful CRUD With Java and MySQL in Minutes article and implemented the Basic authentication, modify the class as given below.
package com.javahelps.usermanagement.service

import okhttp3.Credentials
import okhttp3.Interceptor
import okhttp3.OkHttpClient
import retrofit2.Retrofit
import retrofit2.adapter.rxjava2.RxJava2CallAdapterFactory
import retrofit2.converter.gson.GsonConverterFactory


class ServiceFactory private constructor(private val retrofit: Retrofit) {

    companion object {
        @Volatile
        private var INSTANCE: ServiceFactory? = null

        /**
         * Returns a singleton ServiceFactory.
         */
        fun getInstance(baseUrl: String, username: String, password: String): ServiceFactory =
            INSTANCE ?: synchronized(this) {

                INSTANCE ?: build(baseUrl, username, password).also { INSTANCE = it }
            }

        /**
         * Build a ServiceFactory object.
         */
        private fun build(baseUrl: String, username: String, password: String): ServiceFactory {
            // Required only if using Basic authentication
            val clientBuilder = OkHttpClient.Builder()
            val headerAuthorizationInterceptor = Interceptor { chain ->
                var request = chain.request()
                val headers = request.headers()
                    .newBuilder()
                    .add("Authorization", Credentials.basic(username, password))
                    .build()
                request = request.newBuilder().headers(headers).build()
                chain.proceed(request)
            }
            val okHttpClient = clientBuilder.addInterceptor(headerAuthorizationInterceptor)
                .build()

            // Create a Retrofit object `.client(okHttpClient)` is required only if using Basic authentication
            val retrofit = Retrofit.Builder()
                .client(okHttpClient)
                .addCallAdapterFactory(RxJava2CallAdapterFactory.create())
                .addConverterFactory(GsonConverterFactory.create())
                .baseUrl(baseUrl)
                .build()
            return ServiceFactory(retrofit)
        }

    }

    /**
     * Return the given service object.
     */
    fun <T> build(service: Class<T>): T {
        return retrofit.create(service)
    }
}package com.javahelps.usermanagement.service
import retrofit2.Retrofit
import retrofit2.adapter.rxjava2.RxJava2CallAdapterFactory
import retrofit2.converter.gson.GsonConverterFactory
class ServiceFactory private constructor(private val retrofit: Retrofit) {
companion object {
@Volatile
private var INSTANCE: ServiceFactory? = null
/**
* Returns a singleton ServiceFactory.
*/
fun getInstance(baseUrl: String): ServiceFactory =
INSTANCE ?: synchronized(this) {
INSTANCE ?: build(baseUrl).also { INSTANCE = it }
}
/**
* Build a ServiceFactory object.
*/
private fun build(baseUrl: String): ServiceFactory {
val retrofit = Retrofit.Builder()
.addCallAdapterFactory(RxJava2CallAdapterFactory.create())
.addConverterFactory(GsonConverterFactory.create())
.baseUrl(baseUrl)
.build()
return ServiceFactory(retrofit)
}
}
/**
* Return the given service object.
*/
fun <T> build(service: Class<T>): T {
return retrofit.create(service)
}
}The build method is used to build a service client using the interface we created in Step 8. I created such a generic method assuming we may have several service interfaces. However, we will call this method only once with the UserService class in the next step.
Step 10:
Create a service reference in the MainActivity.kt class and lazily initialize it as shown below. Also, create the disposable variable which we will use later.
package com.javahelps.usermanagement

import android.os.Bundle
import android.support.v7.app.AppCompatActivity
import com.javahelps.usermanagement.service.ServiceFactory
import com.javahelps.usermanagement.service.UserService
import io.reactivex.disposables.Disposable


class MainActivity : AppCompatActivity() {

    private val service by lazy {
        val factory = ServiceFactory.getInstance("http://10.0.2.2:8080", "admin", "admin")
        factory.build(UserService::class.java)
    }
    private var disposable: Disposable? = null

    override fun onCreate(savedInstanceState: Bundle?) {
        super.onCreate(savedInstanceState)
        setContentView(R.layout.activity_main)
    }
}ipconfig or ifconfig command to get the IP address). If you do not use Basic Authentication, username and password "admin", "admin" are not necessary for the getInstance method.Step 11:
We are almost set. Now we need to create Button click event handlers for all the buttons we have created in Step 5. First of all, create a helper function named
showResult as given below to display a given message in Toast:private fun showResult(message: String) {
Toast.makeText(this, message, Toast.LENGTH_SHORT).show()
}fun readUser(view: View) {
val username = etUsername.text.toString()
this.disposable = this.service.read(username)
.subscribeOn(Schedulers.io())
.observeOn(AndroidSchedulers.mainThread())
.subscribe({ user ->
run {
etUsername.setText(user.username)
etPassword.setText(user.password)
etName.setText(user.name)
etEmail.setText(user.email)
}
},
{ showResult("Failed to read the user $username") })
}etUsername and call the service.read method. Since the read method returns a ReactiveX Observable object, we ask to run it asynchronously using IO threads (.subscribeOn(Schedulers.io())) and to show the response using Android Main thread (.observeOn(AndroidSchedulers.mainThread())). If we get the result, we show it to the user. If we get an error, we show a message to the user.Similarly, create the
createUser function, updateUser function, and deleteUser function as given below.fun createUser(view: View) {
// Construct a user object
val user = Model.User(
etUsername.text.toString(),
etPassword.text.toString(),
etName.text.toString(),
etEmail.text.toString()
)
this.disposable = this.service.create(user)
.subscribeOn(Schedulers.io())
.observeOn(AndroidSchedulers.mainThread())
.subscribe({ showResult("Successfully created the new user ${user.username}") },
{ showResult("Failed to create the new user!") })
}fun updateUser(view: View) {
val username = etUsername.text.toString()
// Construct a user object
val user = Model.User(
etUsername.text.toString(),
etPassword.text.toString(),
etName.text.toString(),
etEmail.text.toString()
)
this.disposable = this.service.update(username, user)
.subscribeOn(Schedulers.io())
.observeOn(AndroidSchedulers.mainThread())
.subscribe({ showResult("Successfully updated the user $username") },
{ showResult("Failed to update the user $username") })
}fun deleteUser(view: View) {
val username = etUsername.text.toString()
// Prevent from accidentally deleting the admin user
if ("admin" == username) {
showResult("Cannot delete admin!")
return
}
this.disposable = this.service.delete(username)
.subscribeOn(Schedulers.io())
.observeOn(AndroidSchedulers.mainThread())
.subscribe({ showResult("Successfully deleted the user $username") },
{ showResult("Failed to delete the user $username") })
}Step 12:
You may have noticed that all our CRUD functions in Step 11, assign their last statement to the disposable variable. Note that we call the service asynchronously in a fire and forget manner. The user may exit the application immediately after clicking a button. In such a scenario, we should stop waiting for the result. Therefore, override the onPause function and call the disposable.dispose function.
override fun onPause() {
super.onPause()
disposable?.dispose()
}package com.javahelps.usermanagement
import android.os.Bundle
import android.support.v7.app.AppCompatActivity
import android.view.View
import android.widget.Toast
import com.javahelps.usermanagement.service.Model
import com.javahelps.usermanagement.service.ServiceFactory
import com.javahelps.usermanagement.service.UserService
import io.reactivex.android.schedulers.AndroidSchedulers
import io.reactivex.disposables.Disposable
import io.reactivex.schedulers.Schedulers
import kotlinx.android.synthetic.main.activity_main.*
class MainActivity : AppCompatActivity() {
private val service by lazy {
val factory = ServiceFactory.getInstance("http://10.0.2.2:8080", "admin", "admin")
factory.build(UserService::class.java)
}
private var disposable: Disposable? = null
override fun onCreate(savedInstanceState: Bundle?) {
super.onCreate(savedInstanceState)
setContentView(R.layout.activity_main)
}
fun createUser(view: View) {
// Construct a user object
val user = Model.User(
etUsername.text.toString(),
etPassword.text.toString(),
etName.text.toString(),
etEmail.text.toString()
)
this.disposable = this.service.create(user)
.subscribeOn(Schedulers.io())
.observeOn(AndroidSchedulers.mainThread())
.subscribe({ showResult("Successfully created the new user ${user.username}") },
{ showResult("Failed to create the new user!") })
}
fun readUser(view: View) {
val username = etUsername.text.toString()
this.disposable = this.service.read(username)
.subscribeOn(Schedulers.io())
.observeOn(AndroidSchedulers.mainThread())
.subscribe({ user ->
run {
etUsername.setText(user.username)
etPassword.setText(user.password)
etName.setText(user.name)
etEmail.setText(user.email)
}
},
{ showResult("Failed to read the user $username") })
}
fun updateUser(view: View) {
val username = etUsername.text.toString()
// Construct a user object
val user = Model.User(
etUsername.text.toString(),
etPassword.text.toString(),
etName.text.toString(),
etEmail.text.toString()
)
this.disposable = this.service.update(username, user)
.subscribeOn(Schedulers.io())
.observeOn(AndroidSchedulers.mainThread())
.subscribe({ showResult("Successfully updated the user $username") },
{ showResult("Failed to update the user $username") })
}
fun deleteUser(view: View) {
val username = etUsername.text.toString()
// Prevent from accidentally deleting the admin user
if ("admin" == username) {
showResult("Cannot delete admin!")
return
}
this.disposable = this.service.delete(username)
.subscribeOn(Schedulers.io())
.observeOn(AndroidSchedulers.mainThread())
.subscribe({ showResult("Successfully deleted the user $username") },
{ showResult("Failed to delete the user $username") })
}
private fun showResult(message: String) {
    Toast.makeText(this, message, Toast.LENGTH_SHORT).show()
}
override fun onPause() {
    super.onPause()
    disposable?.dispose()
}
}Step 13:
Time to test your application! Save all changes; Make sure that the web service is up and running; Run the Android application. Once your application is running, enter the username admin and try to read the complete user information.
If everything works as expected, congratulations! You have successfully accessed a MySQL database through a REST web service. You can apply the same logic for any web service access from an Android application. If you have any issues, feel free to comment below.
Find the project @ Git Hub.


Comments
Post a Comment